
Softube Bass Amp Room
This gear has sold
See similar gear from other Reverb sellers

Our users rate Reverb
What it is:
A suite of the three classic bass foundations to shape and drive music.
How we use it:
Spice up lackluster pre-recorded bass parts or use it for tracking and live shows.
Why it's cool:
The ability to move the microphones and take advantage of the room makes all of the difference between a good and great bass track.
Softube purchases are strictly licensed for sale to customers in the USA only!
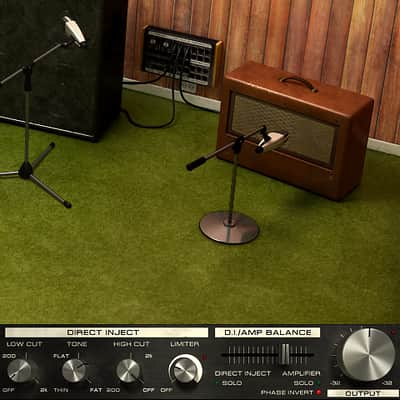
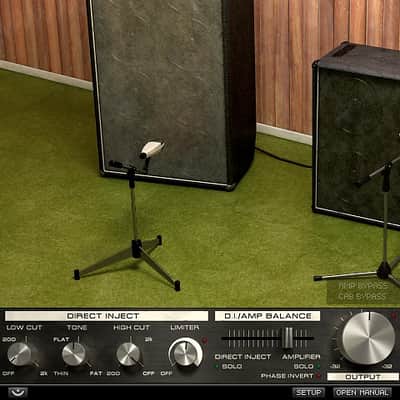
Bass Amp Room was designed to handle all your bass amp needs, from dirty rock to modern clean. It consists of a model of a bass amplifier, three distinctive speaker cabinets with click-and-drag mics, and a blendable DI section with tone controls and a limiter.
Bass Amp Room has got everything you need to create a unique signature sound in no time. It's well thought out, and the high quality building blocks will help you produce a huge range of sounds. The Bass Amp Room is all about getting a sound you know you can trust, and getting it quickly.
Although it was originally designed as a guitar amp, the 70's amp that has been modeled has proven to be an excellent choice for bass players. A thick and solid preamp distortion without any fizziness lets you crank it up without losing the low end. The power amp has a more traditional power amp distortion (controlled by the Master Volume knob), which at extreme settings will give you all the dirt you can handle. The High/Low switch wasn't a part of the original amp, but was added to give you a cleaner and fatter sound when necessary.
There are three different cabinets in Bass Amp Room. The 8 x 10" is an industry standard for fat and solid bass tones with lots of low end and lots of definition. The 4 x 12" may be a good choice for rock sounds with its focused and hard sound. And lastly, while an open back 1 x 12" may not be the first cabinet choice that springs to mind for bass, this is something that works extremely well in the studio.
Many engineers like to blend in some DI signal from the bass in the mix, and to facilitate this we have added a DI section that does precisely that, and more - we also put in three tone controls and a limiter.
In Short- Authentic amp and cabinet modeling
- One amplifier and three versatile and good-sounding cabinets
- Flexible and continuous click-and-drag mic positioning
- Slider control to blend in the DI sound from within the plug-in
- one control, Low and High cut filters plus limiter in the DI section
Compatibility
Version 2.0 of the Softube plug-ins have the following minimum requirements.
All native versions- Mac OS X 10.8 or newer
- Windows 8, Windows 7 (latest Service Pack, 32/64 Bit)
- Windows 10
- Intel Core 2 Duo, AMD Athlon 64 X2 or newer
- Screen resolution larger than 1280x800
- 1 GB RAM or more, and at least 6 GB hard disk space for installation (individual plug-ins take less space)
- Any VST, VST3, AU, or AAX (Pro Tools 10.3.7, 11.0.2 or higher) compatible host application
- iLok License Manager (iLok USB key is NOT required)
- Broadband internet access for downloading installer and register licenses.
All Softube plug-ins support both 32- and 64-bit hosts and operating systems, although a 64-bit OS is recommended. Supported sample rates: 44.1, 48, 88.2, 96, 176.4 and 192 kHz, in both mono and stereo. Please, make sure that you always use the latest iLok License Manager.
AAX DSP version
- For AAX DSP you need to meet the reguirements for the Native version. You also need to have an Avid HDX processing card.
- Different plug-ins will have a different load on your HDX card.
Windows XP and Vista are no longer officially supported.TDM/VENUE is no longer supported.
Installation Instructions
Create a Softube/Gobbler account here: https://www.softube.com/index.php?id=myaccount
Download and install the Gobbler App
- Open the Gobbler App and sign in using your Softube/Gobbler account
- In the Gobbler App, click "Install All" to install all Softube products you have a license for - use the license key emailed to you by Reverb SYNC.
- If you have new licenses, keep the Gobbler App running when starting your DAW. The first time you run a plug-in, you will get a prompt for activation. Please follow the step by step instructions.
- We auto-detect your computer operating system, so just click the download button above.
- Find the downloaded plugin (it's in your computer's download folder, or wherever you've chosen to save it) and double click the installer.
- A plugin installer window will open. Simply go through the installation process.
- We will also send you an email with a link to re-download in case you need it.
- If Ableton Live is closed, open it and skip to #5.
- If Ableton Live is already open, go to Preferences.
- Go to Files & Folder.
- Click "Rescan plugins".
- Find the plugin in the Ableton plugins folder in the sidebar.
- Drag-and-drop the plugin onto your track at the bottom of the screen.
- Open Logic Pro X. Newly installed plugins should be detected automatically every time Logic is opened.
- If you've downloaded an effect or utility plugin, these can be used on an insert for any track in the mixer.
- Create a software instrument track if you downloaded a virtual instrument plugin.
- Under Default Patch, go to AU Instruments and choose the plugin you just installed.
- Open Pro Tools. Newly installed plugins should be detected automatically every time Pro Tools is opened.
- If you've downloaded an effect or utility plugin, these can be used on an insert for many types of tracks (Audio, Aux, Instrument, Master Fader...)
- If you’ve downloaded a software instrument, create a new Instrument track.
- Navigate to the Mixer and locate the newly created Instrument track.
- Select the desired instrument plugin by clicking on any of the Inserts on the Instrument track.
- Go to the Reverb SYNC Software and plugin Collection.
- Choose your desired plugin.
- Reverb will auto-detect your platform, so simply click the download button.
- Continue the installation process by following the prompt.
- Hover your mouse over the smart control button.
- Click Show Inspector icon.
- Click on plugins and choose your desired plugin.
General Instructions: