From modest beginnings in the mid-1990s to its current beloved presence in the world of gear, the Eurorack synthesizer is firmly established as an important contemporary instrument. Bubbling up from the underground, the independent world of Eurorack has been a revolutionary player in keeping live, hardware-based electronic music thriving and essential.
Eurorack has always been about responding directly to the needs of the musicians who desired creative immediacy instead of an impenetrable workstation interface or mouse and screen.
That said, from the outside, you may be looking at Eurorack as its own impenetrable world. To help you navigate what may be a new realm of standalone modules, messy patch cables, and power-supply concerns, we're here to walk you through the basics of building a Eurorack system. But first, a bit of backstory.

Charting decades of innovation in electronic instruments must begin somewhere, and Doepfer is that beginning. Dieter Doepfer started his company and began developing a voice card modular system in the early 1980s. Development wrapped up in 1982, but by 1983, MIDI was standardized and the DX7 was released. The market for synthesizers shifted rapidly. Doepfer carried on, however, and developed a reputable line of MIDI controllers.

By 1992, Doepfer turned his attention back toward analog, designing the MAQ16/3 Sequencer with seminal electronic outfit Kraftwerk. This was followed by the successful MS-404, a rackmount analog monosynth module, in 1995. Doepfer then revisited his designs from the early 1980s and by the fall of 1996 released the A-100 Analog Modular System, a complete complement of analog modules housed in a standard 19” rackmount enclosure. The continued collaboration with Kraftwerk resulted in the system's distinctive all-silver appearance.
Significant to the establishment of the Eurorack standard in 1996 was the case itself.
The mechanical specification for the Eurocard enclosures was adapted by Dieter Doepfer, who then designed the power supplies and bus boards (what you plug the modules into, more info below), which could easily be fit into existing rack cases commonly found secondhand in Europe at the time.
The modules themselves adhered to specifications from this industrial standard. The module height was three rack units (3U) and the width was measured in the Eurocard-specific Horizontal Pitch (hp) standard, where 1hp equals 0.2 inches, or 5.08 mm. The modules were largely low-cost, compact, and had some components on their boards that were socketed instead of soldered down, so the user could, for example, upgrade to a better op-amp IC.
The Basics of Power Supplies
When you're beginning your Eurorack system, getting a little comfortable around electronics is key; a little technical work and some basic math is required. Those new to the format first need to familiarize themselves with power specification.
The Doepfer-designed power system consists of two components: the power supply and bus boards. The power supply is currently the A-100 PSU3, updated as of 2015. However, it's common to find used Doepfer cases floating around that have the A-100 PSU2. This is important, as the two have different specifications.
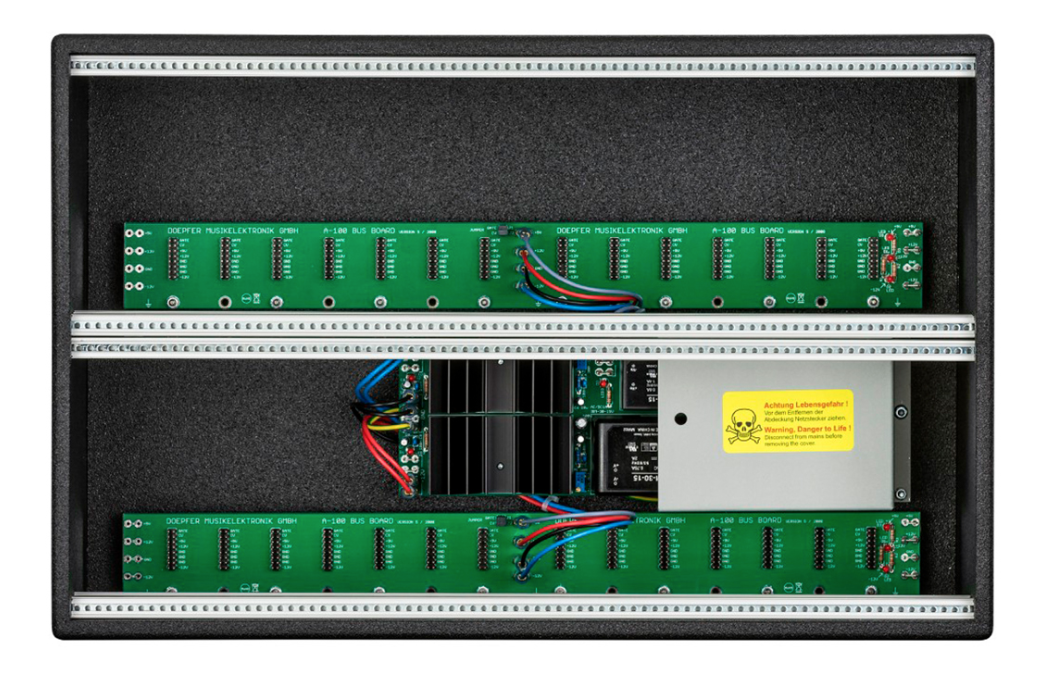
Second are the bus boards, where the modules are plugged in within the case. The Doepfer bus board allows for a maximum of 14 modules to be plugged in. A standard Doepfer case, either rackmount or portable, consists of two rows of 84hp, 6U high (as pictured above), containing one PSU and two bus boards.
The modules connect to bus board via a 10-to-16 or 16-to-16 pin cable, depending on the design of the module. The 16 pins on the bus board are arranged in pairs and carry the following signals, from top to bottom: Gate, CV, +5V, +12V, GND, and -12V. The bottom 10 pins do most of the work, providing + and -12V to power the modules. The top two pins are for Doepfer's optional internal CV and Gate routing. The +5V rail is used on a select number of modules requiring some extra power.
If you don't want to buy a pre-assembled case, you can save money by building your own with the Doepfer DIY kit. That said, while Doepfer is a pioneering company, there are now many other brands making Eurorack cases, like Tiptop Audio, Arturia, Pittsburgh Modular, and more. You can find all Eurorack cases on Reverb here.
While Doepfer-style bus boards are actual circuit boards, you can also find what are called flying bus boards. These connect in the same fashion, but instead of the hard, green circuit board, the connectors are attached to a flexible ribbon. These can save you some hassle in mounting a circuit board to the back of a case.
Learning How to Power Up
The two things newcomers to Eurorack need to know is how to plug in the modules and how to calculate the power consumption of the modules. Plugging the modules in seems easy enough, but in reality, special attention is required. Experienced Eurorack users will double- and triple-check their connections before powering up, no matter how long they've been working with the system. The standing convention is that the (typically) red stripe on the ribbon cable connecting the modules to the bus board must line up with -12V. This should be labeled on the module, and is always labeled on the bus board.
Although many manufacturers build some type of protection into their circuits now, tales of poor souls plugging a module in backwards and frying it have plagued forums for years. Doepfer boards have open pin configurations, but some manufacturers offer shrouded or keyed headers on their bus boards. In this case, be sure to still check the red stripe as there is a possibility for flipped connectors on the bus cable itself.
Planning Power Consumption
As for power consumption, anyone familiar with putting together a pedalboard has likely done the same type of math. At its most basic, you want to know that the amount of power your power supply is putting out is enough to give all of your modules what you need. So you'll to consult the power ratings of everything.
First, check the power supply. As mentioned, the Doepfer A-100 PSU2 is common, which provides 1200 milliamps (mA) of current to both the +12V and -12V rails. After that, check the specifications for the modules. The manual or manufacturer’s website should let you know how much current in mA is required to power up the module. Next, check the specs on all the modules in the system and calculate how much power is needed. Finally, make sure it falls under what your PSU specifies, and leave a little headroom if possible.
With the classic Doepfer case, a user would need to fall in under 1200mA on both rails. It’s good common sense to split up the modules pretty evenly between the two bus boards. If a module requires +5V, most manufacturers, including Doepfer as of 2015, include that in the power specification at this point. However, with the older Doepfer cases an adapter must be used, which pulls current from the +12V rail. Keep in mind that the mA required on the +5V rail will be subtracted from the available current on the +12V rail.
Even after 20 years, the power specifications in Eurorack are not technically standardized, but most manufacturers take after Doepfer. With a little technical dedication and some easy math, anyone can get a system powered up. Once the boring work is through, the best part follows: learning about synthesis and making fascinating, original sounds.
Perhaps the most important consideration, but one that may be difficult to grasp when you're first starting out, is what kind of Eurorack rig you want to make.
You can create a classic analog synth voice—that is, a rig that generates its own waveforms and offers an assortment of wave-shaping tools to sculpt textures, timbres, and character to the generated signal. Or, you can build a rig that's more of a drum machine than a traditional synth. Another option is to build an effects rack that only processes sound you're generating elsewhere (say, from a semi-modular synth). You can go beyond the standard monophonic systems in favor of stereo or even polyphonic ones.
The possibilities are vast, which is a great contributing factor to the exploratory nature of Eurorack. But for the purposes of this beginner's guide, we'll break it down in terms of a classic synth voice. Such a system will be a self-contained instrument all its own and a building-block toward future exploration.
To create a full synth voice you'll want at least: an oscillator, a filter, a VCA, and an envelope generator or two (often one for filter, one for VCA), an effects unit, and some kind of mixer or output module.
Choosing an Oscillator
The simplest way to go about finding the right oscillator is by first asking, "Do I want an analog or a digital oscillator?" and from there, "Do I want this to be more conventional or complex?"
An analog oscillator is a natural choice for a beginner. Since such units are the original basis of synthesis, there are many easy-to-find and easy-to-use analog oscillators, with plenty of creative and more modern-voiced options to explore as well.
For starters, when looking at modules, look for the term voltage-controlled oscillator, or VCO. In a VCO, the sounds of the oscillator are coming directly from electricity. Compared to a digital oscillator, a VCO's generated waveforms—sine, triangle, sawtooth, or square waves—will be slightly unstable, as there will be small fluctuations in pitch and timbre as the voltage changes over time. This helps lead to the unique character that many people love about analog oscillators. (If you want to learn more about the basics of waveforms, check out our "Intro to Synthesis" video series.)
Some straightforward to relatively-straightforward VCOs include: Erica Synths Pico VCO, 2hp OSC, and Make Noise STO.
For some digital oscillators that offer new sounds and more flexibility, look to the modern-standard Mutable Instruments Plaits or a wavetable generator like the Erica Synths Graphic VCO, which gives you a visual representation of the waveforms it's creating.
Choosing a Filter
More than just about any other single component of a classic synth setup, a filter is going to impart the most character. When looking at your options, you'll see many that are modelled after the filters first found in beloved vintage synthesizers. So one way of determining which one's right for you is to think about some sonic touchstones you'd like your music to emulate.
Filter modules like the AJH Synth MiniMod will offer that classic Moog Ladder Filter sound. Doepfer's A-124 will give you the 12dB-per-octave buzz of the EDP Wasp. Mutable Instruments Ripples offers the Roland SH-101's filter. Tiptop Audio's Z2040 is modelled after the Sequential Circuits Prophet-5, while its Forbidden Planet takes after the Steiner-Parker Synthacon. And both Erica Synths and Industrial Music Electronics offer Polivoks VCF filters, like those found in the classic Russian synths.
For Buchla-style noises, there are variants of filters called low-pass gates or LPGs available, like the Pittsburgh Modular Lifeforms Dynamic Impulse Filter or Make Noise Optomix.
However, such examples barely scratch the surface of available filter modules, and you'll also find plenty of filters that, instead of emulating previous circuits, are characterful in their own ways, like the Mannequins Three Sisters. The Intellijel Polaris, a versatile multi-mode filter, allows you to choose between 27 different filter types.
For a more complete look at the many types of classic synth filters, check out our "Guide to Synth Filter Types."
Choosing a VCA
Much like the voltage-controlled oscillator, the voltage-controlled amplifier or VCA is an analog component—and it's an essential piece of a Eurorack rig. Your VCO alone is going to generate a continuous full-voltage signal. If you want to create distinct notes out of it, and be able to turn it on and off with, say, a keyboard controller, you'll need at least one VCA, and you'll likely want more.
Simple and affordable VCAs include the 2hp VCA, Pittsburgh Modular Dual VCA Module, and the Doepfer A-132-1 Dual VCA.
Choosing an Envelope Generator
Once you have a signal coming out of a VCA, you'll be able to start and stop the generated signal from the VCO. An envelope generator (or EG) will let you give a shape to the sound, like the naturalistic rise and fall of notes as heard on acoustic instruments. This is where the common terminology of synth sound design—attack, decay, sustain, and release, or ADSR—comes in to play.
To give form to notes, you'll adjust each of those parameters on the envelope generator. When adjusting the ADSR of the VCA's output, you'll be shaping the amplitude, but you can similarly shape how the filter interacts with notes by using another ADSR envelope to modulate the filter's cutoff frequency.
The Intellijel Dual ADSR is a good envelope generator for beginners, as it is a two-in-one module with intuitive fader controls for each of the parameters. Tiptop Audio's Z4000 VC-EG is also a popular, no-nonsense envelope generator, though it is a single unit.
Choosing LFOs, Modulators, and Effects
Once you have the more foundational modules listed above, you're well set to add some greater variation to the signal by way of modulation or effects units.
Low-frequency oscillators or LFOs are the simplest ways to introduce tremolo to a signal, and you'll often find them as part of other modules. You can send an LFO signal to your VCO in order to add warble or to your filter to vary how it catches and releases your notes.
From there, there are boundless options. Something like Make Noise Maths is a perennial favorite for all of the many ways it can loop, sum, and multiply your signal, which includes two LFOs. And there's no shortage of specific effects units like Intellijel's Springray II reverb, 4ms' Dual Looping Delay, WMD's Compressor, or many others.
Choosing a Mixer or Output
One last piece of essential gear is some kind of utility module that lets you take all the signals you're crafted and sends it out as audio. The Make Noise Rosie is a straightforward, affordable, full-featured output module.
As one last bit of advice: If all of this talk of cases, power supplies, and the potential cost of numerous modules makes you nervous to take the financial and mental plunge into Eurorack, you can get your modular feet wet with an all-in-one semi-modular system like the Moog Mother-32, Make Noise 0-Coast, or Pittsburgh Modular Lifeforms SV-1, or even a keyboard-based semi-modular synth like the Moog Grandmother.
With such instruments, you can make music immediately, with no need to buy anything else, but you can then start to build a complementary Eurorack system to go alongside them. For example, instead of worrying about starting with an oscillator, you can make a case just for the effects you'd like to use with your semi-modular. For more tips and techniques to accomplish this, you can watch our tutorial "Expanding Your Semi-Modular Synth with Eurorack Modules."
To learn about growing your system further, check out our Eurorack Templates: Building a Basic Synth, Effects Rack, and Sampler.
Contributors to this article include Wesley Groves, Tony Rivas, Theron Humiston, Grant Winship, and Joel Handley.