I got into multiband distortion in the mid-'80s, and designed a processor called the Quadrafuzz. The reason why is that in the late '60s, I had given up on guitar amps, because at that time, tubes were a dying technology. I converted to flat-response, solid-state keyboard amps, and started a quest to get the best possible sound before the guitar signal hit the amp—I didn't want to depend on the amp to be a part of the signal chain.
Ultimately, I ended up liking the sound of multiband distortion better than conventional distortion. With conventional distortion, all the strings interact with each other. If you hit a high note, and then a low note, they'll conflict with each other and create intermodulation distortion. For single-note leads, single-band distortion works fine. But for power chords and chords, playing a lot of strings at the same time often produces a muddy mess.
Multiband processing splits a guitar's signal into multiple frequency bands—such as lows, lower mids, upper mids, and highs—and then processes each band individually. With hardware, this is complex, expensive, and difficult to implement. But in today's software-based world, multiband processing is easy to do, and opens up entirely new ways to shape sounds. Such as:
- Splitting a guitar into three of four bands, and then distorting each one individually with an amp sim, gives a more defined, articulated distortion effect. When you hit a low open string and then play a solo high on the neck, the two don't interfere with each other but sound distinct.
- Chords sound clear, and the notes sound distinct, even with distortion.
- Delaying low frequencies can add "mud" that doesn't happen when you delay only the upper mids and treble. Also, long delays on the higher-frequency bands and shorter, slapback-type delays on lower-frequency bands can create a delay effect that sometimes fits tracks better than single-band processing.
- Splitting an instrument into four bands and chorusing each one separately can give gorgeous, lush chorusing effects.
To create multiband effects, you need to create parallel audio paths, and then divide the audio into multiple bands. When Line 6's Helix came out, it made multiband processing easier than ever. I've created a set of presets, called Craig Anderton's Amazing Helix Multiband Presets, that takes advantage of multiband processing. It's been very successful, so apparently the word is getting around about how cool this type of processing can be. But, not everyone has a Helix, so let's explore a variety of ways to create multiband processing in other ways.
You need parallel signal paths for as many bands as you plan to use. Let's assume four-band multiband processing, because that's often all you need. There are several ways to create parallel signal paths.
Parallel Paths in Existing Processors
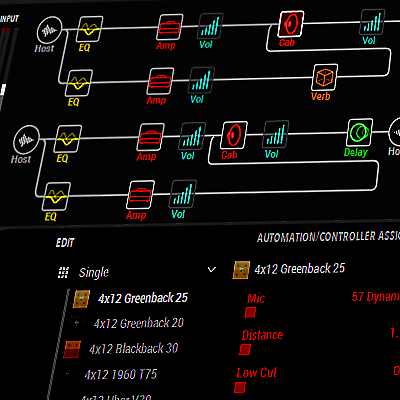
Some devices already have parallel paths. For example, the Helix offers up to four parallel paths (Fig. 1). Assigning them to the same input provides four bands of parallel processing.
Native Instruments' Guitar Rig includes a splitter module to create parallel paths. You can even split each splitter output into another splitter, thereby creating four parallel paths (Fig. 2).
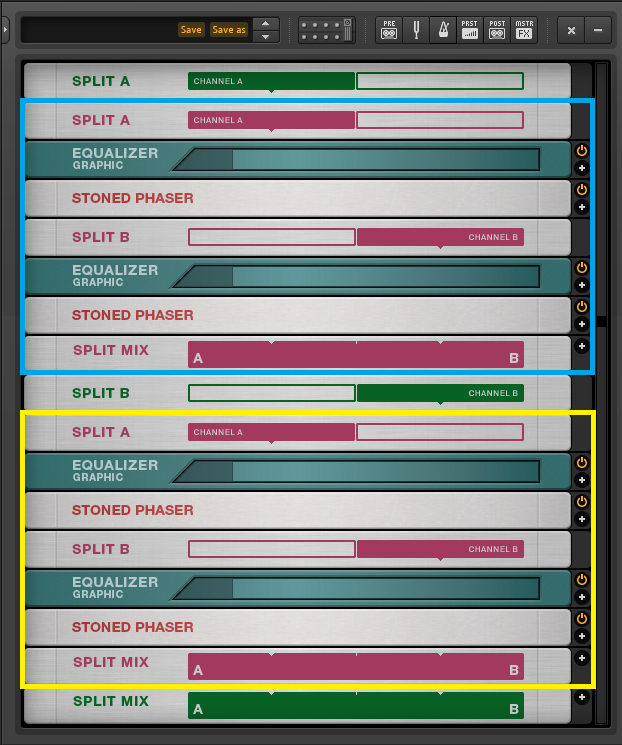
The screenshot shows two main splits, Split A and Split B, colored green. Split A goes into another set of splits (outlined in blue). Each of these splits has an equalizer to filter out a specific frequency band, and a phaser effect. Split B goes to another set of splits (outlined in yellow), which also have an equalizer and phaser in each split. The end result is four parallel phaser paths, with each phaser dedicated to processing a specific frequency range.
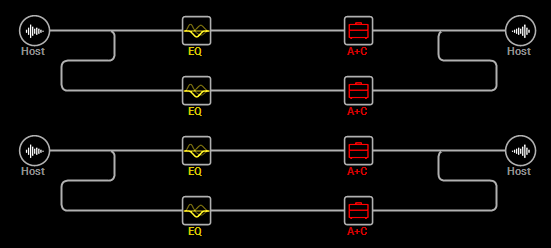
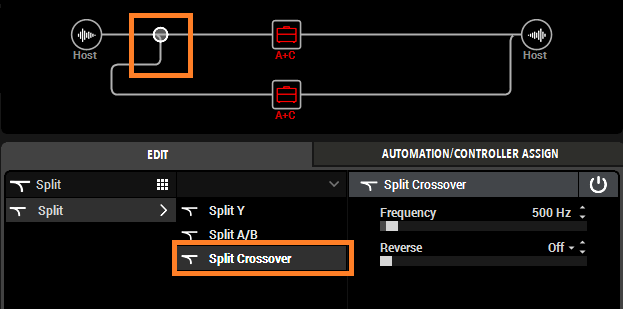
Both Helix and Guitar Rig also have a Crossover option for two-band setups. A crossover divides the incoming signal into high and low bands, each with its own output. With the Helix, this is available when you split a path into two parallel paths (Fig. 3).
Splitting Options in Host Programs
Even if you don't have a multiband-friendly amp sim, some host software has applicable features. For example, PreSonus Studio One's effect chain architecture, which allows combining multiple effects into a single "container," includes a sophisticated splitter module that can split a signal into multiple bands, not simply provide a crossover (Fig. 4). You can then insert your processors into each split for multiband processing.

You can also create parallel paths using Sends or Aux Tracks, like this example in Cakewalk by BandLab (Fig. 5).
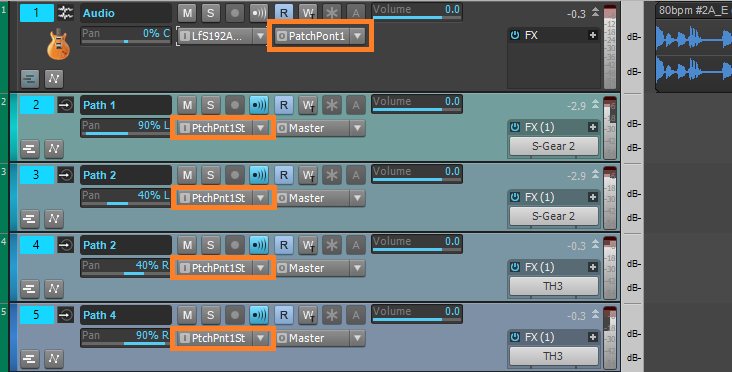
A brute force option is to copy a track as many times as you want bands, and insert the appropriate effects into each track.
Now we need to create different frequency bands. Although some splits in software programs can split by frequency, aside from the Studio One example above, these are usually 2-band crossovers—you can separate everything below and above a certain frequency. This works if you need only two bands, but in host programs, another option is to use multiband compressors (but not set for compression) to create multiple bands. Here's how to do it.
- Insert a multiband compressor in one of the splits, and listen to only this split. Set the compression ratio for all bands to 1.0:1. This defeats compression so the plugin can become a multiband crossover.
- Solo what will be the lowest band in the multiband compressor, and then adjust the band's high and low boundaries to cover the desired frequency range for this band.
- Save the multiband compressor settings as a temporary preset. Insert an instance of the multiband compressor into the next split, and load the temporary preset.
- Leave the low band alone. Solo the second band you want to adjust, e.g., lower mids. Adjust the high- and low-frequency boundaries to cover the desired frequency range for this band, then overwrite the temporary preset with this preset.
- Insert another instance of the multiband compressor into the next split, and load the last preset you saved.
- Leave the bands you've already adjusted alone. Now adjust the frequency boundaries to cover the desired frequency range for the third band, e.g., upper mids. Save this over the temporary preset.
- Insert another instance of the multiband compressor in the fourth split, and load the last preset you saved.
- Leave the bands you've already adjusted alone. Now adjust the frequency boundaries to cover the desired frequency range for the highest frequency band.
- Solo each split. Now each split has been restricted to a particular band of frequencies (Fig. 6).
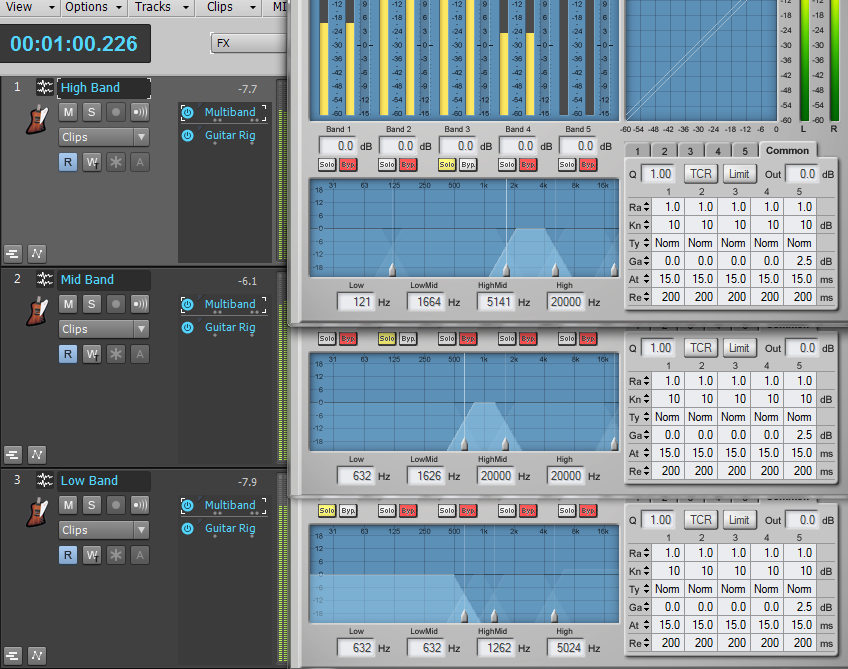
Of course, because you're using multiband compressors as crossovers, you can add some compression to provide yet another variation.
Multiband Processing in Ableton Live
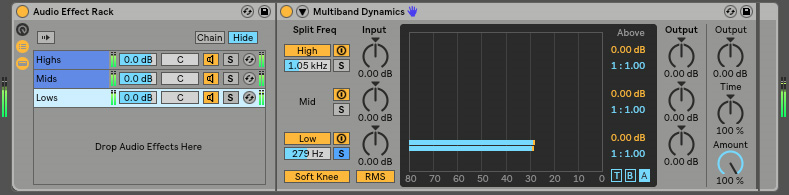
Live's rack effects make 3-band multiband processing easy. Drag a blank Audio Effect Rack into a track, and then insert Live's Multiband Dynamics processor. To have it serve as a crossover, not a compressor, click on the A button. While holding Shift, click and drag one of the Above blocks all the way to the right so all Above thresholds are at 0, with a ratio of 1:1.00. Similarly, click and drag the Below blocks so the Below thresholds are at -80 dB.
With the source audio playing, solo each of the bands and adjust the Split Freq parameter for the best spectral distribution among the highs, mids, and lows. Solo the High band.
Right-click on the Chain's label and select Duplicate. In the new Chain's multiband, solo the Mid band. Right-click on either Chain's label and select Duplicate. In the new Chain's multiband, solo the Low band (Fig. 7).
Now you can do tricks like add reverb to only the highs, add delay to only the mids, place an amp sim after each band so each amp needs to handle only a narrow range of frequencies, and the like.
Then again, not every amp sim has split options, and not every program includes a multiband compressor. However, a graphic EQ can often do the job. For example, Helix Native doesn't have a multiband compressor, but includes a 10-band graphic EQ block. Inserting one at the beginning of each parallel path can restrict the frequency range as needed (Fig. 8).
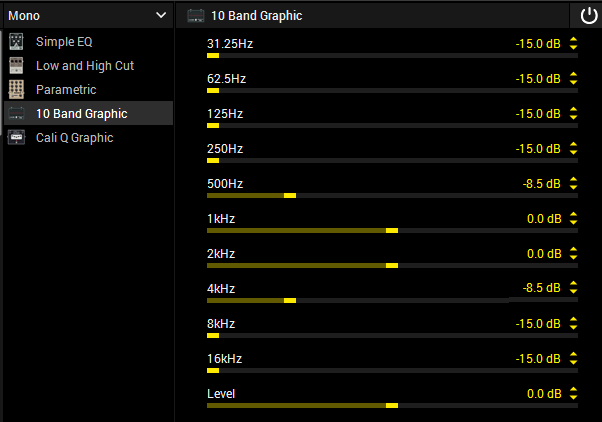
As another example, the highest band (not shown) has 2, 4, 8, and 16 kHz up full, with 1 kHz at about -8 dB. The bands overlap somewhat, but where to split the bands can vary with your guitar of choice, and the preset's purpose.
It takes a bit of effort to set up an environment for multiband processing, whether you use filtering, multiband compressors, sends with a host program, etc. Save a template for your amp sim (or a track preset or template for host programs) so you can call it up any time you want multiband processing.
Once the individual bands are set up, this is where the real fun begins. For each split, you may want to include the same processor but with different settings, and/or processors in some splits but not in others (e.g., octave divider on only the low frequencies and octave multiplier on only the high frequencies). Or you might want completely different processors in each split. Here are some tips to help you get the most out of multiband distortion.
- Articulate notes better with heavy distortion. To have notes "ring out" above the distortion, on the highest band cut back on the amp's Drive, and increase its channel or master volume.
- Instant open-back cabinet. Use EQ on the lowest band to roll off frequencies below about 150 Hz or so.
- Experiment with the drive or other input level control. Because of the filtering to separate the audio into bands, there isn't as much signal going into each amp. So, you'll probably want to turn up an amp's drive control.
- Stereo imaging. With a software host, the tracks into which you insert your amp sims will have panpots for stereo placement. Try keeping the high and low bands centered, but pan the two middle bands somewhat oppositely. This gives a satisfying stereo spread without sounding gimmicky.
- Extremely flexible sound-shaping. You can optimize each amp, cabinet, and virtual miking for the best results with the different frequency bands.
- Dirty + clean. Pan distorted signals left and right, but a clean signal in the center. It's almost like having two different guitars, and sounds huge.
For more information about amp sims, check out the book How to Get the Best Sounds Out of Amp Sim Software, published by Hal Leonard.
About the author: Craig Anderton is an internationally recognized authority on musical technology. As a musician, producer, and engineer, he has played on or produced over 20 albums and has mastered hundreds of tracks. He has authored over 35 books and more than 1,000 articles for Guitar Player, Sound on Sound, Electronic Musician (which he co-founded), Pro Sound News, Mix, and several international publications. Visit his website here.