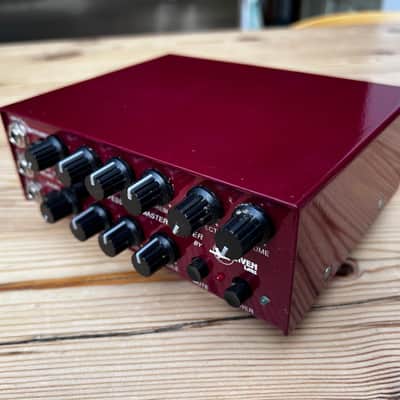
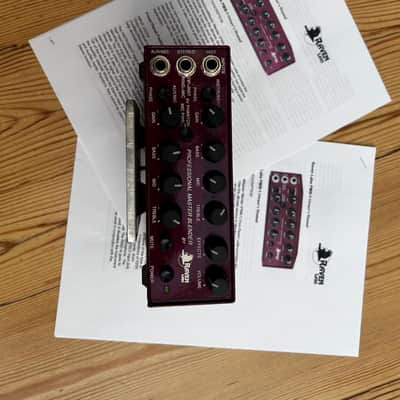

Raven Labs Professional Master Blender PMB-1 2022 - Claret Red
This seller has not set a shipping cost for Sweden. Please contact them to ask about shipping.

Our users rate Reverb
This Raven Labs PMB-1 Professional Master Blender was bought from the Bass Centre in London in August 2002. Even then, these incredible preamps were revered by acoustic guitar and bass players for their abilities, with low noise and huge bandwidth. They allow blending of 2 different pickup sources, with stunning results.
The following description is taken from the Owner’s Manual:
“GENERAL DESCRIPTION
The Professional Master Blender (PMB-1) from Raven Labs provides the
professional musician the ultimate device in blending together two separate
signal sources. It can be used with an acoustic guitar or bass having a piezo
pickup and sound hole microphone, a stereo instrument, two separate
instruments or keyboards, or instrument, drum machine, tape deck, etc. Of
course, it also makes a great preamp for any single instrument.
Great care has been taken in the selection of components and impedances to
insure crystal clarity, wide frequency response, low noise and minimum
distortion. As well, it is packed with useful features. The Master Blender can
be powered with two nine-volt batteries, or a wall mounted A/C adapter (sold
separately).
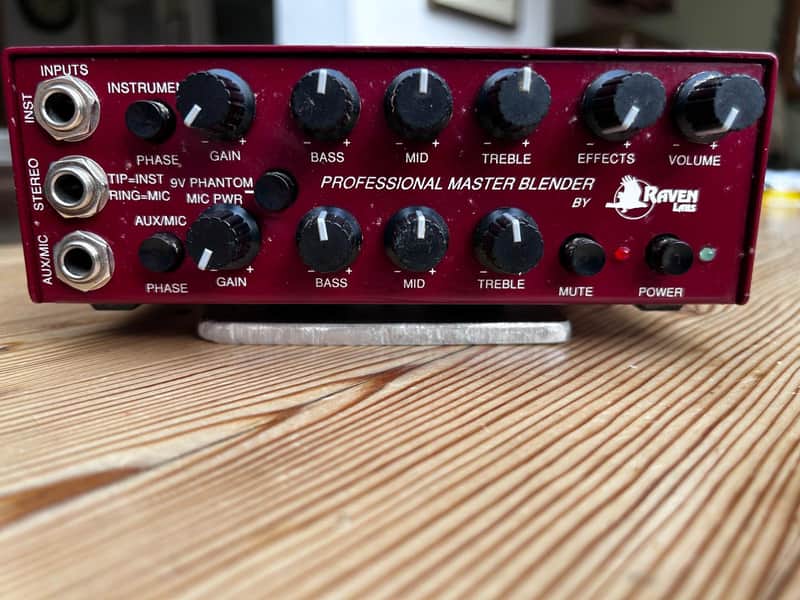
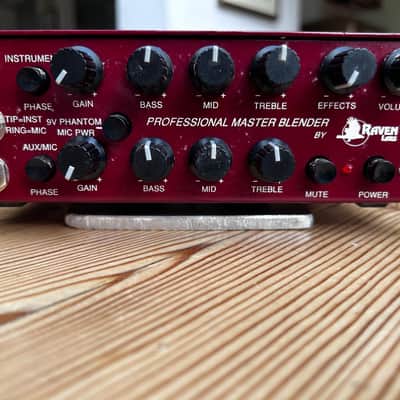
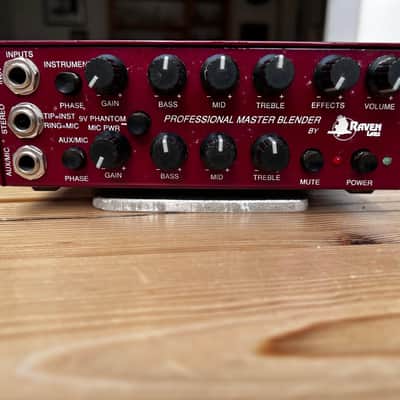
Front Panel Features -
INPUT JACKS
Three individual input jacks labelled INST (Instrument), STEREO, and AUX/MIC
(Auxiliary/Microphone) are provided. Each input is equipped with an RF trap to
help eliminate radio station interference.
The INSTRUMENT input is ideal for piezo pickups and all devices needing a
high input impedance. The input impedance is 10 Meg ohms. If you are not
blending two signals, we recommend using this input regardless of the type of
pickup. The AUXILIARY/MICROPHONE input has an input impedance of 820K
Ohms, and is suited for microphones, magnetic pickups, keyboards, drum
machines, etc. It also has "phantom power" if needed. The STEREO input jack
can receive a dual signal, such as a pickup and soundhole microphone. The
TIP of the stereo jack is sent to the Instrument channel. The RING is goes to
the Aux/Mic channel. When the Stereo input is used, it disables the Instrument
and Aux/Mic inputs. Therefore, they cannot be used in conjunction with the
Stereo function.
PHASE SWITCH
A Phase switch is provided for each channel to help eliminate feedback and
other phasing problems. In the OUT position, the input and outputs are normal
(in phase). Pushing the switch IN reverses the phase. If you are experiencing
early feedback with an acoustic instrument, try using the Phase switch to
alleviate the situation. As well, remember that your position on stage can
influence when feedback can occur. Always start out with the Phase switch in
the normal (out) position.
PHANTOM POWER SWITCH
Pushing this switch in provides nine-volts DC to the Aux/Mic input jack or to
the Ring of the Stereo jack. This voltage is slightly higher when using the
optional A/C adapter. Activate this function ONLY when you are using a
soundhole mic or other device needing 9 volt "phantom power". Engaging the
Phantom Power switch with nothing plugged into the Aux/Mic or Stereo input
jack, will effectively reduce battery life. ALWAYS check the position of this
switch BEFORE turning on the Master Blender. If you need phantom power,
push the switch in after your connections are complete.
GAIN CONTROLS
Each channel is supplied with an individual Gain Control. It affects the level
going to your tone controls, and all output jacks. Once you have set your Gain
to a desired level, use the Master Volume for "live" adjustments. This will avoid
changing the level at the XLR direct out.
Start with the Gain control at about the 10 o'clock position. Then adjust your
tone contols to their desired settings. Adjust the Volume to a comfortable
listening level. Boost the Gain until you hear some distortion or "clipping" upon
striking a loud note or chord (depending on the output level of your instrument,
this may not occur). Now, lower the Gain control just below where the
distortion disappears. Use the MasterVolume to set your overall volume. This
allows you the maximum signal to noise ratio the Master Blender has to offer.
Remember that boosting any one of the tone controls can affect the optimum
position of the Gain Control.
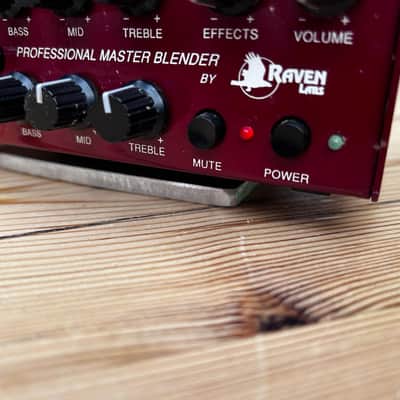
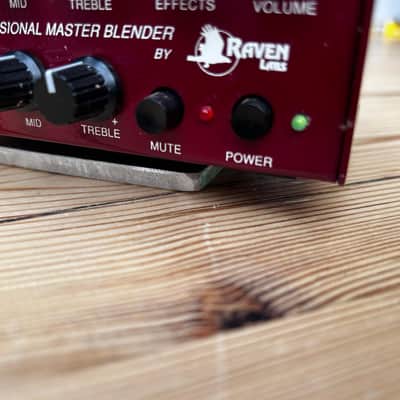
TONE CONTROLS
Individual Bass, Midrange, and Treble controls are provided for each channel.
The "flat" position, or where the controls have no effect, is when the pointer is
straight up (12 o'clock). Turning the control clockwise from the flat position
boosts the tone control, counter clockwise cuts the tone control. Cut or boost
is a maximum of 12 dB.
The Bass is centered around 80 Hz, midrange is set at 800 Hz, and the Treble
boosts at 3 KHz. The bandwidth of each control is different, and set to be
musically pleasing.
EFFECTS CONTROL
The Effects control blends the signal coming from your effects device with the
sound of your instrument. The Effects Loop is a side chain design. Along with
the Effects blend, this helps to maintain a truer or more accurate signal. If your
effect has a blend control, turn it all the way up. See the Effects Loop section
for more information.
If you don't hear a signal coming from your effects, or any other device you
may have plugged into the effects return jack, check the position of the Effects
control.
VOLUME CONTROL
The Volume Control adjusts the level at the Line Out (To Amp) jack only. It
DOES NOT affect the level at the XLR, Effects Send, Tuner, or Channel Patch
jacks. If the level is too "hot" or loud at these points, turn down the Gain
control. You can then readjust the level at the Line out with the Volume.
POWER SWITCH
Pressing in the Power switch turns on your Master Blender as indicated by the
green LED lighting. Always be sure that your unit is turned off when not in use
to avoid draining the batteries. IMPORTANT: Since there are turn on and turn
off transients, turn the Master Blender on BEFORE patching to other
equpment and off LAST.
MUTE SWITCH
There may be instances when you want to "mute" the signal going to the XLR
or Line out jacks, such as when tuning up or changing instruments, etc.
Pushing the Mute switch in stops the signal going to the XLR and Line out
jacks as indicated by the red LED lighting. Push the switch again to return to
normal as indicated by the green Power LED lighting. It does not affect the
Tuner, Effects Send, or
Channel Patch jacks.
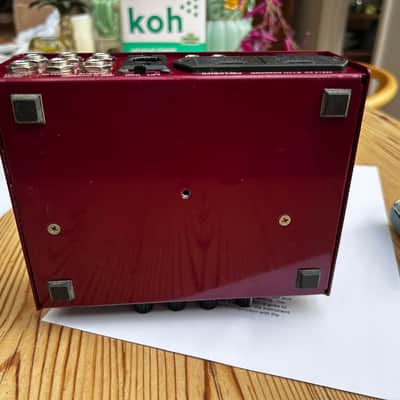
Rear Panel Features
LINE OUT JACK (To Amp)
Present at the line out is the blended signal of all inputs that are in use. The
level at this jack is adjusted by both the Gain and Volume controls.Use this
jack to send a signal to an amplifier or any piece of equipment desired.
Always use a high quality shielded cable when using any of the input and
output jacks on your Master Blender.
TUNER SEND JACK
To tune up silently between songs without disturbing your band mates or sound
engineer, hook up a tuner to this jack and push the Mute button. Since the
Tuner Send is on a side chain, it does not load down your instrument.
Therefore, it is more desirable than plugging your instrument directly into a
tuner and then going to your preamp or amp.
EFFECTS LOOP (SEND AND RECEIVE JACKS)
To use the Master Effects loop, plug a shielded cable from the SEND jack to
the INPUT of your effects, and a second patch cord from the OUTPUT of your
effects to the RETURN jack. Use the Effects blend control on the front panel to
adjust the amount of effects with the sound of your instrument. If the Effects
control is in the full counter-clockwise position, your effects device will NOT be
heard. Turning the Effects control clockwise introduces more of the effect into
the overall sound.
You may also use the Return jack to mix in other external signals such as a
mono tape source, drum machine, etc.
CHANNEL PATCH JACKS
These jacks can be used as individual channel effects loops, to send the
3 of 5
individual Instrument and Aux/Mic channel signals out to a stereo amp, or to
receive a stereo signal that can be mixed in with the Master Blender.
To use as an INDIVIDUAL CHANNEL EFFECTS LOOP, a stereo cord is
needed. The "tip" of the Channel Patch jack is the send, and the "ring" of the
Channel patch jack is the return or "receive". The Effects blend control on the
front panel DOES NOT affect this function. Use the level on your effects
device for the desired amount of coloration.
To send the SEPARATE CHANNEL SIGNALS to a stereo amp or mixer, etc,
use a normal mono shielded 1/4" plug for each channel. Connect the Channel
Patch jack(s) to the input of the unit desired. The level at these jacks is
controlled by the Gain control ONLY. The signal going to the Line and XLR
outs will NOT be interrupted, and function as normal. This allows for a variety
of choices when playing live or recording! Shorting the ring of the Channel
Patch jack to ground does not harm or affect performance.
To MIX IN A STEREO SIGNAL you will need a stereo plug with the "ring" and
"sleeve" wired ONLY. Do NOT ground or wire anything to the "tip" of the stereo
plug inserted into the Channel Patch jacks to use this feature.
To patch from a stereo source, remove the mono plug on the end of the patch
cord inserted into the Master Blender and replace with a 1/4" stereo plug.
Wire the "hot" wire of the mono cord to the "ring" and the shield to the
"sleeve". Again, leave the "tip" blank. Since the master Effects control on the
front panel does not function (it's a mono control), the level must be set by the
external device.
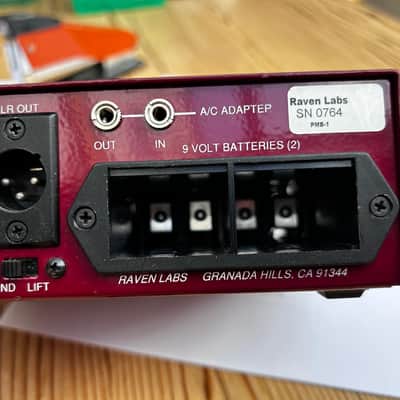
XLR DIRECT OUT
The XLR is a true electronically balanced output and can be used to send a
signal to a tape deck or mixer for recording and live situations. Wiring of the
XLR is American Standard: 1 = ground, 2 = hot, 3 = neutral. The level at the
XLR is affected by the Gain control only. To "kill" the signal at the XLR, simply
use the Mute switch on the front panel.
The GROUND LIFT switch directly below the XLR connector either grounds
(GND) pin 1, or removes ground (LIFT). This is useful for eliminating ground
loops or hum problems.
A/C ADAPTER IN/OUT JACKS
If you have a Raven A/C adapter, insert the output plug into the A/C adapter
"IN" jack. The Master Blender will automatically switch from battery to A/C
operation. DO NOT use any other A/C adapter as the Master Blender works
on a unique +/- 9 volt supply.
All future Raven products will have A/C adapter capabilities and can be
powered using only ONE adapter. To power another Raven product with the
same adapter, run a mini-stereo (3.5mm) cord from the OUT jack on the unit
the adapter is in, to the A/C adapter IN of the second unit. These can be
"daisy chained" for up to 4 Raven units having IN/OUT adapter jacks!
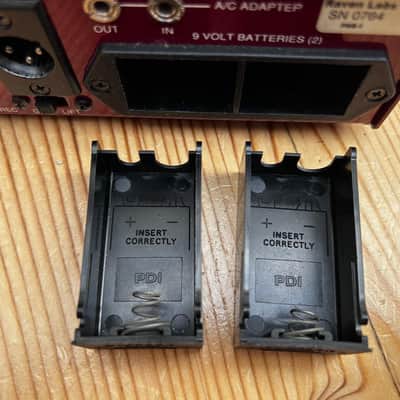
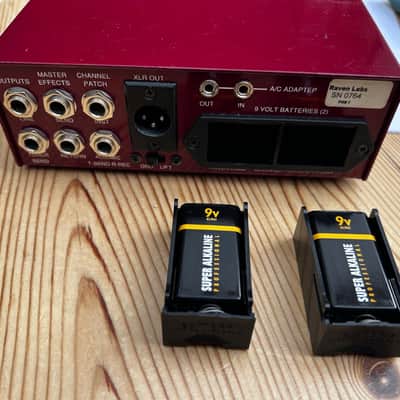
NINE VOLT BATTERY HOLDER
Insert 2 nine volt batteries into the external compartments for battery
operation. Be sure and push the drawers back in until they "click" into place.
4 of 5
Observe battery polarity as marked inside the drawers (+ left, - right). Battery
life should exceed 50 hours under normal use, provided the unit is turned off
after each performance.”
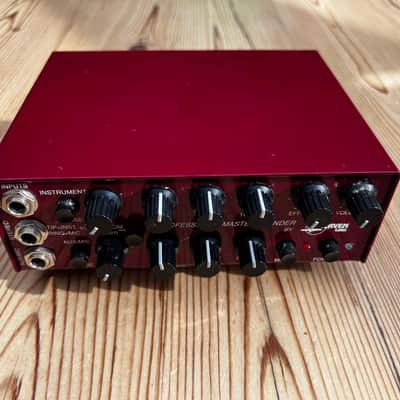
This PMB-1 has been unused for many years, but is in remarkably good condition, barely marked by stage and studio use. I never purchased the mains power unit, being more than happy with the usage I got from 2 x 9v batteries. The power switch on the front (with its visible light indicator) meant that it was easy to stretch the usage over a number of gigs. In my experience the claimed 50 hours of usage was obtainable with little effort.
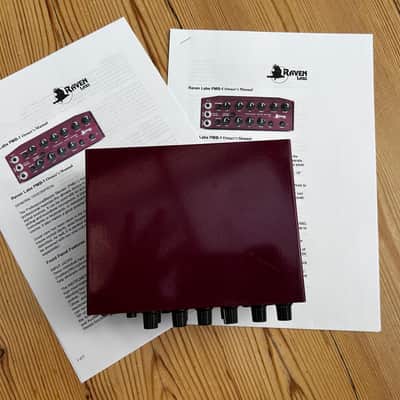
The unit is being sold with 2 copies of the Owner’s Manual, one single sided, one double sided, which were sourced from the internet.
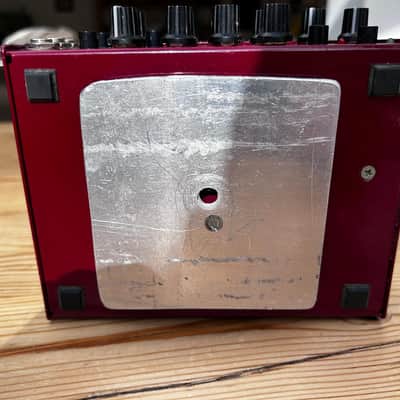
There is a mounting screw on the base of the unit, which is an American size. I needed to mount the unit on a standard mic thread, so I added a very solid, removeable aluminium plate, which has been tapped for the correct thread for a standard mic stand. This is then attached using the appropriate US size screw. This proved to be a very practical solution for stage use. The PMB-1 is completely unmarked by this attachment, which can be completely removed, as shown. There is a blemish on the top of the unit, which was there when bought. It presents as a 2.5cm scratch, but it is covered by the overall red finish, and practically invisible. This does not affect the Blender in use at all, and is mentioned merely for completeness in the description. The Raven Labs Blender is otherwise in excellent/mint condition, despite being nearly 23 years old.
This item is sold As-Described
This item is sold As-Described and cannot be returned unless it arrives in a condition different from how it was described or photographed. Items must be returned in original, as-shipped condition with all original packaging.Learn More.
| Listed | a year ago |
|---|---|
| Condition | Excellent (Used) Excellent items are almost entirely free from blemishes and other visual defects and have been played or used with the utmost care.Learn more |
| Brand |
|
| Model |
|
| Finish |
|
| Categories | |
| Year |
|
| Made In |
|
Product safety information may be available here.