Intro To Synthesis is our six-part video series that promises to lead anyone interested in synths through the foundational building blocks of the instruments.
We'll primarily look at subtractive synthesis, or the type of sound creation you'll find on many keyboard-based synthesizers. (To learn more about the various kinds of synthesis—like additive, wavetable, and others—check out our "10 Types of Synthesis, Explained: FM, Vector, and More.")
Whether you’re a true beginner or an experienced enthusiast, this series is sure to give you a deeper understanding of all of the basic concepts.
Today, we’re beginning with the starting point of any synthesizer’s sound—oscillators, or the generators that create the raw sound the rest of your synth’s features will modify.
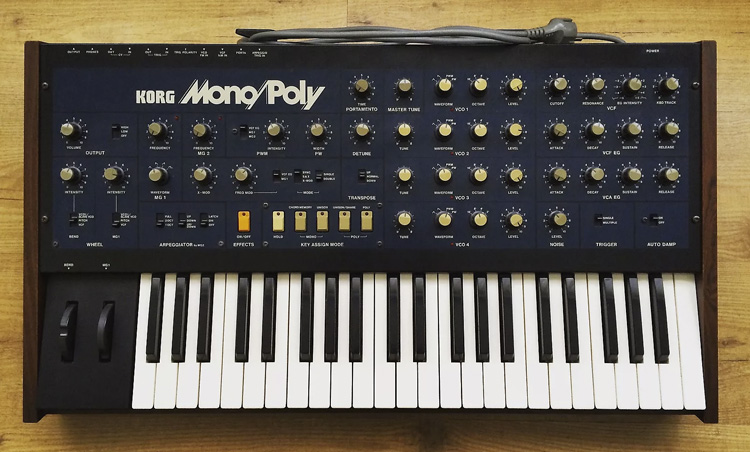
In the first video above, Reverb’s Justin DeLay begins by explaining the various sound waves oscillators generate, demonstrating each of his Korg Mono/Poly.
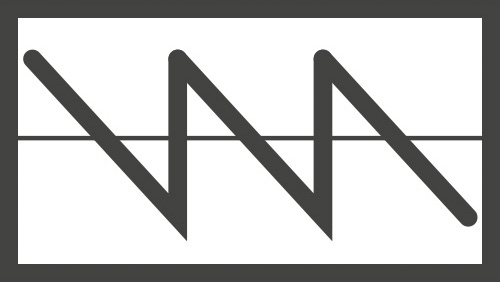
A saw wave or sawtooth wave is a bright, exciting waveform that, as Justin explains, is "really, really great for synthesizing sounds like strings, where you really want to get some of that energy and excitement in the upper range."
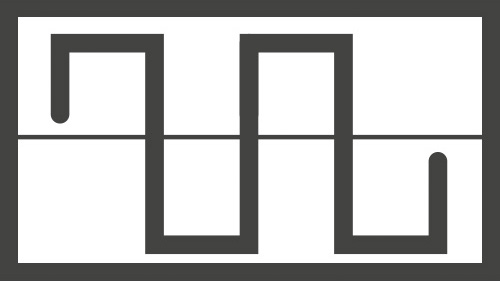
A square wave is a bold, harmonically rich waveform that has a rounder, more vocal or reedy timbre. Because of its harmonic complexity, there are a lot of frequencies present to be shaped by further processing.
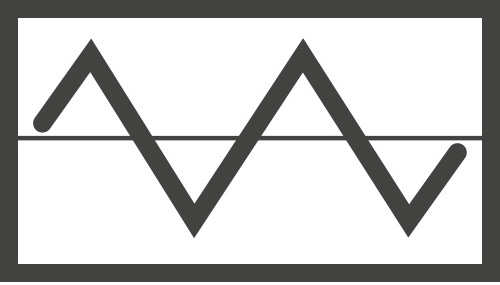
Meanwhile, a triangle wave is a duller sound that, by nature of having a thinner, less lively waveform, is great for bass or muted keyboard tones.
The final waveform Justin explains is noise. By itself, this will sound just like TV static, but when blended with other oscillator waveforms, it can add harmonic complexity and energy to their sounds.
In the second part of Justin’s exploration of oscillators, he shows you how to take the raw sound of the generators and start to give them different shapes and characters with other parts of the synth.
"The cool thing about a square wave is it doesn’t just have to be a square," he says. "It can be a square all the way down to a narrow pulse. And every variation in between will give you a different sound."
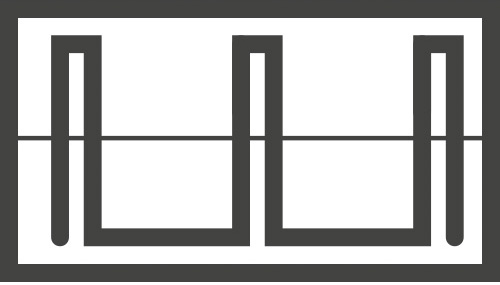
Through pulse width modulation, you can change the sound of the square wave, bringing out different tonal characteristics as you make it thicker or thinner. You can do this manually on some synths, as Justin demonstrates, or through automation, which we’ll explore later in the video.
Because many synthesizers include more than one oscillator, you can stack them on top of each other "to make a bigger, more harmonically interesting sound."
The octave or range function of an oscillator allows you to choose the frequency range played by the oscillator. So when using multiple oscillators, you can set one to, say, the bass range and others to higher ranges, separating the sounds as if they were individual members of an ensemble.
For those who might be confused about why their range or scale knob includes numbers like 32’, 16’, 8’, and 4’, this is a holdover from the time of pipe organs, where the actual length of the pipe would determine how low or high the notes would be.
In addition to changing octaves, you can also fine-tune an oscillator’s note with the tune knob. Slightly detuning one oscillator in the same range as another, will introduce a beating, pulsating pattern similar to guitar strings just barely out-of-tune.
Modulation is a major concept necessary to understanding synthesis. It involves taking the signal from one area of a synth and using that output to change another signal, without needing to manually turn a knob.
As just one example of this concept, Justin sends an LFO, or low-frequency oscillator, to the synth’s pulse-width knob to introduce a varying width to the pulse wave (as demonstrated manually earlier in the video). In addition to changing the shape of the square wave, you can also use an LFO to modulate the pitch.
In Part 3, we turn our attention to filters, or the tone shapers that will add character to an oscillator’s generated soundwave.
We begin by explaining what happens when using a low-pass filter, which cuts out higher frequencies while allowing low frequencies to "pass" through. As you turn your low-pass filter knob, you can determine how many higher frequencies are being cut.
You can see the effect the low-pass filter has on a complex soundwave. A square wave’s higher frequencies, or upper harmonics, are what make it more complex than a sine wave—which contains only the fundamental frequency of a note. If you use a filter to cut the high-end out of a square wave, it will sound (and, in a waveform analyzer, appear) more like a sine wave.
The resonance of a filter accentuates the frequencies right at the cutoff, adding gain that can bring different qualities to your tone, from nasal or vocal to sharp, piercing, laser-like sounds. By twisting the filter’s resonance knob, you can perform a resonance sweep.
"A synthesizer is going to create a huge amount of sound. Even when you’re playing one note, you’re going to be creating a bunch of upper-order harmonics and frequency content that’s going to give a very, very rich sound," Justin says. "As you filter down, you’re focusing more and more of that synthesizer sound on the root note that you’re playing."
But you don’t just have to manually twist knobs to bring movement and character to your synth’s sound. There are a number of ways you can automate filter moves. By using a synth’s key tracking function, your synth will open or close the filter’s cutoff settings while you play higher or lower on the keyboard.
Envelopes are "another fundamental way to shape your filter and your synth," Justin says. Envelopes open and close a filter over time, simulating the natural decay of an acoustic instrument’s sound—making a note get duller over time, just like the striking and fading of a violin or a drum.
You can also shape your filter with automated modulation—using an LFO to open and close your filter at different rates. Setting a slow LFO speed can help make a repetitive part interesting, as it brings different timbres to the notes as the filter slowly sweeps.
Because so much character comes from a synth’s filter, different makes and models of synths are prized for the qualities of their individual filters. Justin demonstrates the differences in sound in the filters of a Korg Mono/Poly, a Moog Minimoog Model D, and a Roland Juno-6, which, in addition to a low-pass filter also contains a high-pass filter, which blocks low frequencies while allowing highs to pass through.
In our fourth video, we explore envelopes and their most basic tone-shaping features.
We begin by defining just what an envelope is—"a control signal over time" that determines "how quickly or slowly you’ll close the filter." As a note from an acoustic instrument behaves differently depending on how you hit, pluck, or bow it, synthesizers use envelopes to change how a sound develops over time.
Envelopes generally have four parts that help to determine this response. The attack knob will determine whether a struck note or chord is immediate—like a drum—or gradual, as a bowed violin. While the attack is the upward measure of how loud a sound gets over time, the decay is the downward measure of how loud a sound gets over time, as it falls back from its peak.
Like with an attack setting, a decay knob can be adjusted to have a long or short decay. "But what level of volume are you eventually decaying down to?" Justin asks. That’s the sustain—"the relative volume of your sound after the attack and decay portion have finished."
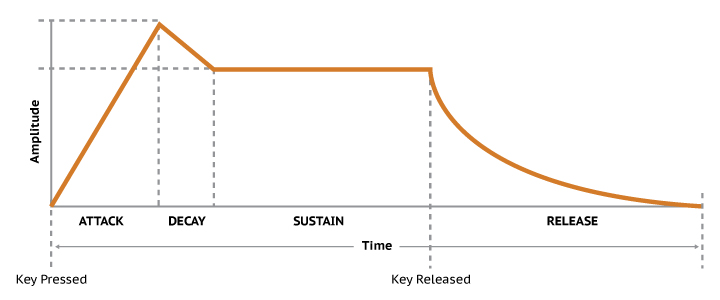
Having no sustain means that the sound will immediately cease after the decay, while a low sustain setting will let the sound settle into a quiet, final volume. The release function determines if the sound quickly stops after the sustain portion, like an organ—which stops as soon as you take your hands off the keys— or if will have a "graceful transition from note to note" and eventual silence.
As Justin demonstrates, with a high release setting, you can have a smooth, flowing sound even if you’re playing the keyboard in a staccato fashion.
In the series’ penultimate video, we dive deeper into envelopes. We’re defining the differences between envelopes, how an envelope’s settings affect your volume and filter, and specific techniques for using envelopes to change the response, timbre, or even the pitch of a given note.
A critical lesson here is that there are different kinds of envelopes, each with similar parameters but distinct functions.
As we saw in Part 4, an amp envelope your signal's volume throughout the attack, decay, sustain, and release portions of a sound, which can be versatile tone-shaping tools by themselves.
It can be used to create a reverse effect—if you set a slow attack and immediate release, which is the opposite of the naturally quick attack and slow release common to instruments like guitars. You can also "defeat" your amp envelope so that the volume remains constant throughout the life of a note, with no attack, full decay, full sustain, and no release. This will give you a pure, on/off sound that’s good for synth basslines.
These same concepts apply to the filter envelope—except, instead of modulating the amplifier’s volume, these envelopes will modulate your synth’s filter and the cutoff frequency of your sound. And the full shape of a synth’s sound will be found through a combination of your amp and filter envelopes.
Dialing in a combination of parameters from the amp envelope and the filter envelope will ultimately determine the timbre and shape your sound. If, for example, you have the amp envelope set to a quick attack, and the filter envelope set at a slow attack, you’ll have a tone that starts immediately but gets brighter over time.
As Justin says, if you want a sound with a longer release, it can sound pleasing to the ear if your filter envelope is set shorter than the amp envelope’s. This will let you hear the full filter sweep down before the volume dies. You can even use the filter envelope to change the pitch of your sound or to introduce pulse-width modulation, or changes in the shape of a square wave.
In the sixth and last episode of our first season, we learn how to use modulation to affect other parts of the synth. We begin with a basic definition what modulation is: the use of "signals generated within your synthesizer to change or shape various aspects of the sound that you’re producing over time."
The process often starts with an LFO, or a low-frequency oscillator. Like any other kind of oscillator, an LFO is generating a constant signal, but instead of sending it out to a speaker, we’re keeping its waveforms inside the synth, using it as a control signal that will command the audible signal.
One way to use an LFO is to set it to generate a sine wave, the simplest waveform, that will then modify a filter. For example, if you raise the LFO's frequency, the filter will open and close faster as it travels along the sine wave.
A standard control setup that can be found on many synths, including Justin’s Mono/Poly, will have the LFO connected to a mod wheel, which allows you to increase or decrease how much the LFO is influencing the filter cutoff.
LFOs, like other oscillators, are capable of producing various kinds of waveforms, such as ramp-down saw waves, ramp-up saw waves, and square waves, which will all modulate a filter, pitch, or pulse width differently.
While a sine wave at a slow speed is great to add a little bit of movement over time to your sound, a square wave at a faster rate can emulate the sound of a sequenced bassline or even create a kind of delay effect on the tail. But you can experiment with any waveform at any speed.
Another classic use that Justin demonstrates is an emulation of pitch vibrato—starting with a pure note and adding vibrato at the end, like a guitarist during a solo or a singer at the end of a line. You can also use an LFO to create pulse-width modulation, as you can with the filter envelope.
Having covered the basics, you're set to explore the vast world of synthesis. You can find more knowledge and inspiration in more of our videos and articles below.