Heavy music is a tricky term, since the big genres that fall under its umbrella — metal, punk, hardcore — all have distinct tropes and production demands.
Doom metal can be fairly bottom–heavy, metalcore will need to be very tight and sharp, and post–metal might call for a Bonham–esque drum sound that would never work on a death metal track.
But as far as recording goes, the aggression, speed, and sonic density of these music styles often leads to pretty similar challenges when it comes time to mix. Done well, a heavy music mix can become a colossal wall of sound, much more massive than the sum of its parts. Treated carelessly, though, it can be crushed under its own weight, ending up muddy and underwhelming.
There are a few basic guidelines you can follow that will get any heavy music mix into great basic shape. From there, you can apply those distinct genre touches that will make your band’s mix supermassive. When mixing heavy music:
- Be merciless with EQ
- Be careful with compression
- Put work into your vocal tracks
These tips and techniques can save a muddled mix. But if you're starting out with a good recording in the first place, these tips will help you add that much more power.
EQ Highlights Sweet Spots and Carves Away the Rest
The big paradox of mixing heavy music is that for each instrument to sound as huge as possible, none of them can be so big as to dominate the mix entirely. There needs to be room in the audible spectrum for each instrument to breath.
Whenever you’re recording, make sure that you’re first and foremost paying attention to the meters on your equipment and in your DAW. If you keep your levels comfortably in the green, just peaking into the yellow part of the meter, you’ll never risk clipping your input signals.
The next step will be going through your individual recorded instrument tracks to minimize invasive bleed from other instruments. This will be especially important if you recorded in a small room or didn’t use optimal mic placement. You’ll need to tighten up those instruments’ sounds so that they aren’t fighting for space in the mix.
You’ll want high quality filter and parametric equalizer plugins for this process. Most DAWs like Pro Tools, Reason, and Ableton Live come with good standard options. But upgrading your parametric equalizer may well make a world of difference, so choose something with a good interface and great sound like the Hofa IQ EQ or FabFilter Pro Q 2.
RELATED ARTICLE

Using EQ to Eliminate Bleed
A guitar that sounds monolithic on its own may be taking up low–end space needed by the bass. Fuzzed–out vocals might be obliterating a crucial hi–hat part.
These problems compound when tracking a band live in one room. There will be bleed between mics when everyone is playing loud, which means you’ll be stuck with some guitar in the drum mics and plenty of other clutter when you first sit down at the mixing desk.
But with careful listening and studied EQ maneuvers, you’ll craft a lean, focused mix that’s full of energy.
When cleaning up muddy tracks, the high–pass filter is your best friend. Simply sweep the filter cutoff up until an instrument starts sounding thin, then back it off to preserve the instrument’s full range while eliminating everything below (50–100Hz is a good starting point for most instruments).
Most high–pass filter plugins will let you add a boost at the cutoff frequency (or the barrier that sets which lower frequencies will be lobbed off) to accentuate an instrument’s fundamental frequency.
If you’re hearing cymbals or other instruments with harsh high frequencies bleed into a lower instrument’s track — like a bass or kick drum — use a low–pass filter to cut the offending frequencies out. Just be careful with that filter because you might end up cutting too much and dulling the instrument you’re trying to isolate.

Guitar EQ
Straighten Up Your Sounds
Due to either issues with recording techniques or gear used while recording, you might find that your instruments have ugly tones you’d like to eliminate.
A great example of this is the “woofy” mid–range sound of a guitar drenched in fuzz. To eliminate that woof, use a notch EQ, which is an equalizer that eliminates all frequencies within a narrow band. If a notch setting is not available in your parametric EQ, just set a narrow band at the frequency you’re trying to filter out and draw it as low as you need to.
Woofy guitars, bass, or kick usually benefit from a scoop somewhere between 200 and 500Hz. Boingy snares, sibilant cymbals, or sympathetically ringing toms will require setting really narrow bands with your notch and moving it around until you figure out exactly where that small, offensive frequency lives.
On the other hand, you may want to accentuate some frequencies that give your instruments distinct and useful flavors.
For this, you’ll want to use a peak setting on your parametric equalizer, which works like a notch but in the opposite direction: instead of cutting frequencies in a narrow band, it boosts them.
Focused boost can emphasize the midrange and high–mid sweet spots that make each instrument sing. On guitar and bass, this can be anywhere from 1–8kHz. The stick attack on any given drum will be in the 2–6kHz range.
Overhead mics on drums may need some gentle shaping to give a good cymbal balance. The frequencies will vary depending on the cymbals and the room, but above 5kHz is a good place to start.
Discretion is the name of the game when boosting frequencies so that you don’t zap all of your headroom. You’ll also want to make sure you're not boosting the same frequencies on every instrument. Mixing up the mid–frequencies you boost will help everything be heard.
RELATED VIDEO

Careful Compression is Your Best Friend
Compression is a double-edged sword. It will thicken up almost anything, but it can also kill the transients that help drums, tremolo–picked guitars, and bass guitar cut through a dense mix. And on top of that, an over–compressed mix will fall flat and lose the dynamics that gave it “punch” in the first place.
There are some great emulations of classic compressors available today that come as low–cost upgrades to the standard options bundled with DAWs. Eventide offers a great replica of the Omnipressor and Waves, among many others, has a great API 2500.
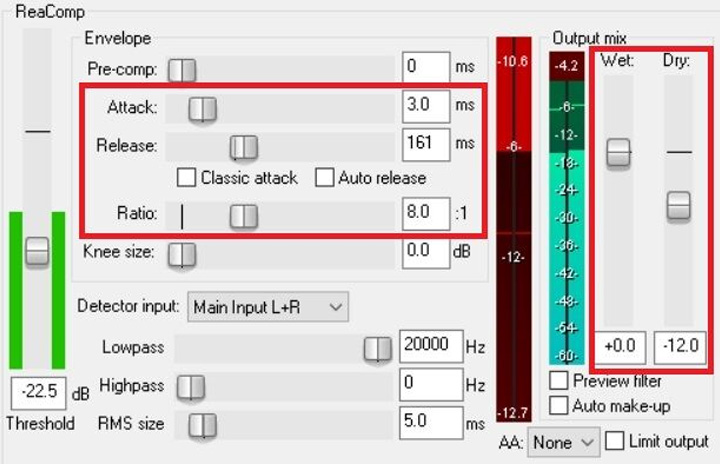
The most important and trickiest parameters in this case are the attack and release times. To make sure the transient of each drum hit or guitar note comes through before the compressor is engaged, don't set the attack below 15ms.
A slow release time can be useful for smoothing out the general level of a bass track or a melodic guitar passage. Drums will generally need a shorter release to let the next hit through.
Another common technique used in modern rock and metal is parallel drum compression. The idea behind parallel compression is that you have one drum mix that is run through heavy compression (fast attack is fine here), and one that is run through no compression. You then mix the two together to taste.
To set this up, just run all of your drum tracks into the same send channel, and stick a compressor on that channel. Adjust the level of the compressed channel to taste.
Parallel Compression
If your compressor VST has a wet/dry mix (like Ableton Live’s Glue Compressor), this will do the exact same thing as parallel compression. The “wet” setting will be the level of the compressed drum mix in relation to the uncompressed one.
Parallel compression will absolutely help achieve a pummeling yet nuanced drum sound, but its effect on the cymbals is especially useful. When an entire drum mix is run through a linked stereo compressor, the kick (and to a lesser extent, snare and toms) will trigger the compression, reducing the loudness the cymbals on each beat.
With a release time carefully matched to the speed of the song, the cymbals will blossom back to normal level by the next beat.
This is often referred to as “pumping” and is historically avoided for its unnatural sound. But in fast, cymbal–heavy music, it’s the ultimate weapon for making distracting, washy cymbals thrash along to the beat. Note that 16th– or 32nd–note double bass passages may be too fast to make this technique work.
Exhume Your Buried Vocals
In most popular genres, the vocals take center stage. But especially in metal, vocals buried in the mix are fairly common in heavy music. Barely audible singing, screaming, or growling can lend tracks atmosphere, sounding like they’re coming up through six feet of grave dirt.
But there’s a difference between mixing vocals well so they sit lower in the mix and totally burying them underneath the distorted guitars and ringing cymbals.
Start by cleaning up and sweetening the vocal track, just like the instruments.
Most vocalists will have a peak somewhere between 100–600Hz where the body of their voice lives. Use the high–pass filter technique described above to get that peak and then use the high–pass filter’s peak or a peak EQ to boost it between 2–8kHz if necessary to bring out their articulation.
If you hear any harsh sibilance in the upper midrange on “S” and “T” sounds, tame it with de-esser plugin like the Hofa IQ De-Esser or a very narrow band of notch EQ.
If the vocal is sounding good already, just add a slow, smoothing compressor, and you're done! A little reverb can be flattering on clean vocals but could add muddiness to screaming or growling, so use discretion.
If the vocals are lacking energy or just not sitting right, some tasteful distortion can be the secret sauce. Just be careful to preserve intelligibility.
With all the overdrive, distortion, and fuzz options available, you’ll need to experiment to find the best flavor for any given vocal. Amp/cab simulators are a safe way to try out different options without committing.
In the hardware realm, simple analog clipping from an overdriven preamp is often a good bet, while some guitar amps may add an unpleasant woof. The right distortion, blended to taste, can help a buried vocal claw its way out of the grave.
RELATED ARTICLE

Bedroom Recording