Positive Grid Metal Signature Pack for BIAS FX
Price€88.27
Incl. VAT
Instant Download
This listing has ended
See similar gear from other Reverb sellers
Listed:over a month ago
Views:10,057
Saves:21
Offers:11

Chicago, IL, United States
Our users rate Reverb
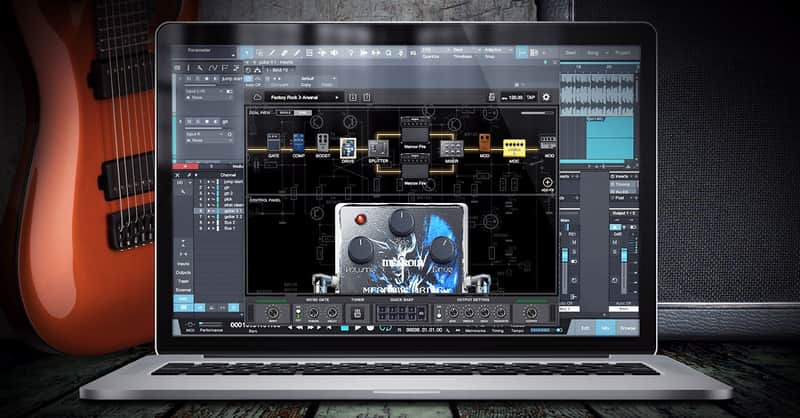
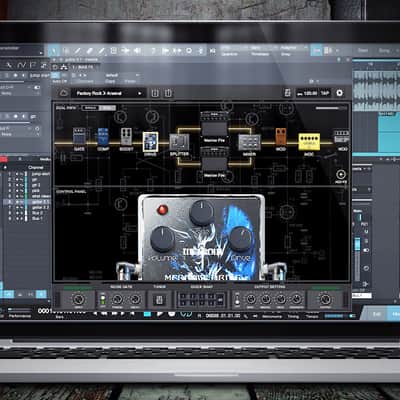
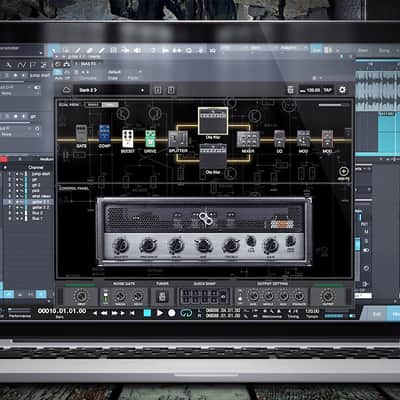
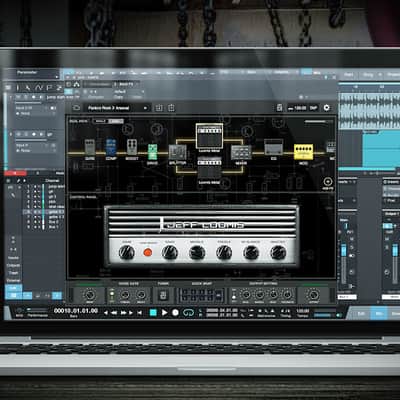
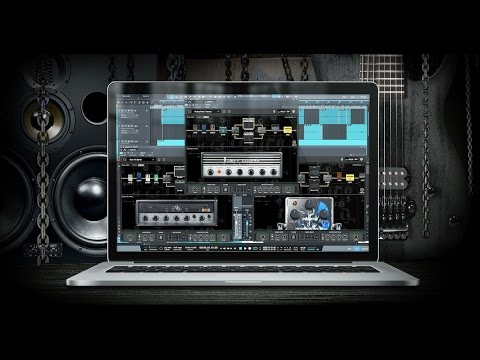
The signature tones of metal's loudest shredders.
What it is:
Twelve signature modeling packs, six amps, and six effects for endless mayhem.
How we use it:
From clean to distorted, this pack nails the iconic guitar tones of your favorite metal records.
Why it's cool:
Distorted tones scream and soar yet aren't harsh on the ears. The clean tones provide for realistically warm, analog goodness. The tone tells it all - from the artists to Positive Grid, there was a lot of care put into this pack.
Compatibility
Mac:
Installation Instructions
General Instructions:
What it is:
Twelve signature modeling packs, six amps, and six effects for endless mayhem.
How we use it:
From clean to distorted, this pack nails the iconic guitar tones of your favorite metal records.
Why it's cool:
Distorted tones scream and soar yet aren't harsh on the ears. The clean tones provide for realistically warm, analog goodness. The tone tells it all - from the artists to Positive Grid, there was a lot of care put into this pack.
Now you can rock with the signature tones from metal giants Jeff Loomis, Keith Merrow, and Ola Englund right in BIAS FX’ dual amps, dual signal chains, and ToneCloud.
Originally released for JamUp Pro, the metal signature pack features Jeff, Ola and Keith’s six signature amp models and six signature guitar pedals – from ultra clean to thrash metal; delay, chorus, four-band parametric EQ to distortion and overdrive – now right in BIAS FX desktop with a newly designed user interface and an overall sound improvement.
Compatibility
Mac:
- OS X 10.9 or later
- Format: Standalone and plugin: Audio Units, VST, RTAS, AAX Native
- 4GB of RAM minimal, 8GB or more recommended
- 700MB free disk space
- Internet connection is required to activate license and access Tone Cloud, BIAS doesn’t support offline activation at this moment. It can run under offline mode after activation and disable Tone Cloud.
- Windows 7 (SP1) or Windows 8
- Format: Standalone and plugin: VST, RTAS, AAX Native
- 4GB of RAM minimal, 8GB or more recommended
- 1.5GHz Dual core processor minimal, 2.0GHz Dual core or more recommended
- 250MB free disk space for per version (32 or 64 bits)
- Internet connection is required to activate license and access Tone Cloud, BIAS doesn’t support offline activation at this moment. It can run under offline mode after activation and disable Tone Cloud.
- Ableton Live - 8.0 or above.
- Avid Pro Tools - 10 or above.
- Ardour - 3.0 or above.
- Apple Logic Pro - 9.0 or above.
- Bitwig Studio - 1.0 and above.
- Cakewalk Sonar - X2 or above.
- Cockos Reaper - 3.4 or above.
- Harrison Mixbus - 2.0 or above.
- Steinberg Cubase - 5.0 or above.
- Steinberg Nuendo - 4.3 or above.
- MuTools MuLab - 6.0 or above.
- PreSonus Studio One - Producer/Professional 2 or above.
- Acoustica Mixcraft - 7.0 or above.
Installation Instructions
General Instructions:
- We auto-detect your computer operating system, so just click the download button above.
- Find the downloaded plugin (it's in your computer's download folder, or wherever you've chosen to save it) and double click the installer.
- A plugin installer window will open. Simply go through the installation process.
- We will also send you an email with a link to re-download in case you need it.
- If Ableton Live is closed, open it and skip to #5.
- If Ableton Live is already open, go to Preferences.
- Go to Files & Folder.
- Click "Rescan plugins".
- Find the plugin in the Ableton plugins folder in the sidebar.
- Drag-and-drop the plugin onto your track at the bottom of the screen.
- Open Logic Pro X. Newly installed plugins should be detected automatically every time Logic is opened.
- If you've downloaded an effect or utility plugin, these can be used on an insert for any track in the mixer.
- Create a software instrument track if you downloaded a virtual instrument plugin.
- Under Default Patch, go to AU Instruments and choose the plugin you just installed.
- Open Pro Tools. Newly installed plugins should be detected automatically every time Pro Tools is opened.
- If you've downloaded an effect or utility plugin, these can be used on an insert for many types of tracks (Audio, Aux, Instrument, Master Fader...)
- If you’ve downloaded a software instrument, create a new Instrument track.
- Navigate to the Mixer and locate the newly created Instrument track.
- Select the desired instrument plugin by clicking on any of the Inserts on the Instrument track.
- Go to the Reverb SYNC Software and plugin Collection.
- Choose your desired plugin.
- Reverb will auto-detect your platform, so simply click the download button.
- Continue the installation process by following the prompt.
- Hover your mouse over the smart control button.
- Click Show Inspector icon.
- Click on plugins and choose your desired plugin.
| Brand | |
|---|---|
| Model |
|
| Categories |
Product safety information may be available here.