With so much software–based and beat–oriented music coming into the world, making your rhythms sound less like they were composed with a machine can go a long way in helping them stand out.
There are a variety of ways to make your beats and percussion feel more human to the listeners, even if the sounds themselves are still completely electronic. By experimenting with some or all of the following techniques, you’ll breathe a little extra spirit into your beat, which is the most viscerally communicative element of music.
All of these techniques are explained using Ableton Live — one of the more intuitive DAWs for working with rhythm — but most will apply in a similar fashion to other major DAWs.
Play with the Timing of Your Drums
The age–old wisdom when it comes to programming drums with a drum machine, sampler, or computer is that humans don’t play exactly on the beat and its subdivisions, no matter how good their timing is.
If you’re programming drums with a step sequencing plugin, your beats will very much so sound like they are in time with a grid. Playing around with swing and quantization can help rectify that robotic issue.
Swing
The simplest trick to lending beats a human hand is to apply swing or shuffle. It was a feature perfected by Roger Linn on the MPC 60 back in the late ‘80s and is still a great trick today.
Yes, it’s basic. But it helped to make early Detroit Techno and Chicago House some of the funkiest machine music around. It can probably help your beats, too.
A 1/16th note swing tends to work well, but experiment with varying amounts of that swing. Just select all of the notes in your grid and apply that setting uniformly.
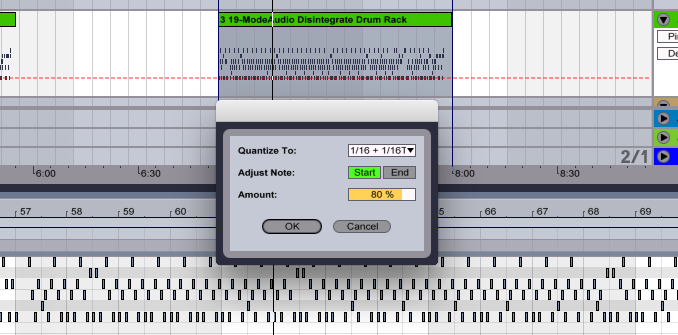
Use the "1/16 + 1/16T" setting at 80% or less for a funkier shuffle than 1/16-note quantization.
If you played beats using a MIDI controller rather than step sequence them, try the “1/16 + 1/16T” quantization value at only 80% or less, rather than full quantization.
This setting tends to result in a shuffled, bouncier beat than 100% 1/16th note quantization. It’s always a good call to start with a lower quantization percentage to preserve as much of the character of your performance, and increase the percentage incrementally if needed.
Apply a Groove
Ableton Live’s Groove Pool lets you apply certain characteristics of a drum loop or audio clip — such as timing and velocity — to another audio or MIDI clip. Similar functionality appears in lots of other DAWs, as well.
In Ableton, you can open the Groove Pool by clicking the little circle with the two tildes (~) all the way to the left of the screen under your browser menus.
Once that’s open, you can drag Clips and Grooves straight from the browser into the Groove Pool. When its in the pool, you can adjust its quantization however much you’d like.
To apply the groove you’ve selected, double–click your audio or MIDI clip and then go to the bottom of the screen. Go to the Clip settings, open the Clip Groove drop–down menu, and select that groove of choice.
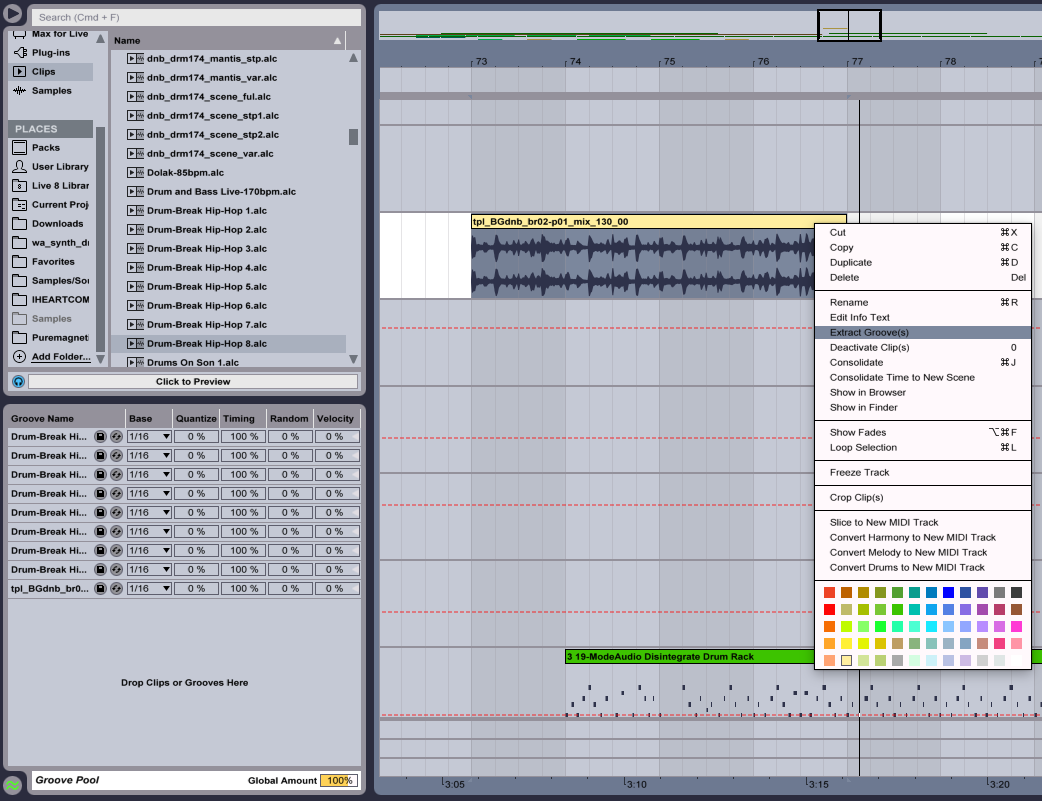
Drag clips and Grooves from the Browser into Ableton's Groove Pool so you can apply amounts of their timing and velocity to your beats. You can also extract the groove from any audio file to add it to the Groove Pool.
From there you can adjust the amount that the groove’s timing and velocity affect your clips.
The cool thing about Groove Pool is that you can extract a groove from any audio whatsoever, be it a choice Clyde Stubblefield break or a Tito Puente jam.
Simply right–click on an audio file once it’s in Ableton, and choose Extract Groove(s) from the menu. The software creates a Groove pattern for the Groove Pool, which you can save to your Library with the disc icon next to its name.
Randomize Your Quantization
Add continuous variety to your rhythm using Groove Pool’s Random setting.
Start with a beat that’s hard quantized to the grid. Assign it basically any groove pattern in the Clip settings, and set all of its parameters to 0% in the Groove Pool.
Hit play, and slowly bring up the Random setting on the groove in the Groove Pool to let the timing fluctuate. You really only need 33% or less randomization, or else you’ll lose sense of your beat’s rhythm.
Try duplicating the track and taking the groove setting off the new one. When you play the two tracks at the same time, you’ll notice the one with some randomness programmed in has a little more life than the other. This can be a cool effect, but just make sure to pan each so they aren’t fighting for the same space in your mix.
Use Automation and Velocity Curves
By default, your drums will be programmed at uniform velocity. One solution is to drag the velocity level on each individual hit so that you get a little more variation in loudness, but this can take some time.
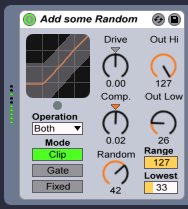
A Velocity MIDI effect can inject
some random variation to
the drum notes' volume.
One alternative is using a velocity MIDI effect, such as Ableton Live’s Velocity, to introduce some automated variety into your drum sounds’ loudness.
You may want to use automation on Velocity’s on/off function to turn it off the downbeats of a measure, since drummers tend to play slightly louder on downbeats.
Automation, of course, can be applied to any program in a DAW. Ableton Live makes this especially easy, giving you the ability to open up the automation for any parameter by just right–clicking it.
Automation on drum sound’s attack and release can help lend that variation that makes your drums sound more organic. Likewise, the amount of a saturation effect or cutoff frequency of a lowpass filter can creating different timbres, which make it sound like the drum is being played at different intensities.
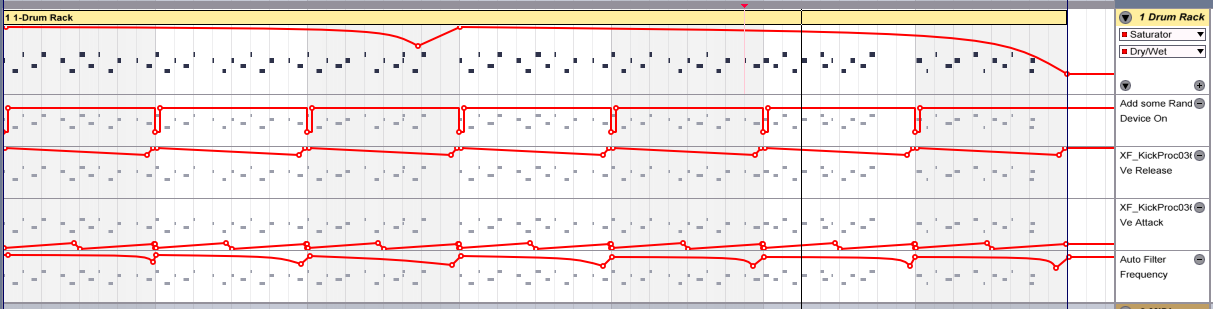
Moderate automation curves can imbue beats with dynamic character.
If you’re using a drum sequencing plugin with a swing or shuffle setting, subtly automate the swing amount a bit above and below your ideal setting.
Build a Smarter Drum Kit
There are a few simple programming tactics that will help your electronic drums mimic the behavior of real life drums. Doing some work to get your virtual instruments to act like their physical counterparts can make your drums sound more live.
Choke Groups
Some software calls them “choke groups,” some call them “exclusive groups,” and on the Akai MPC they’re called “mute groups.” All of these refer to a group of drum sounds that mute when another sound in the group is played. The sounds “choke” — get cut off — when those others are played.
The simplest example is an open hi–hat sound that stops when the closed hi–hat sound is triggered. This mimics how an actual hi–hat works, because once it closes, the cymbals stop ringing.
Many software drum instruments will automatically choke the open hi–hat when the closed hi–hat plays, but you’ll have to program this response yourself when building a drum kit from scratch.
Try choke groups not just on hi-hats but any long sustained sounds that may overlap and muddy up the beat.
Choke groups also have plenty of applications outside of hi–hats. They can be great for bass drum or tom sounds with long decays or for ringing bell sounds. Whatever has a lengthy tail can be an interesting candidate for a choke group.
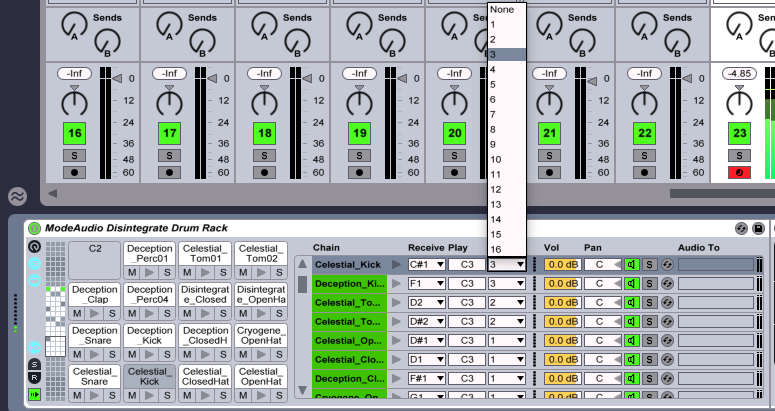
In an Ableton Live Drum Rack, open its Chain List and the Input/Output section.
For each pad in the rack, you’ll find choke list offering groups 1 through 16, with a default setting of None. If you have multiple hi–hats in the kit, assign them all to the same choke group so that every closed hit will stop every open hit.
Multisampling
Packages with sample–based drum instruments — particularly those featuring acoustic drum sounds — often include many layers of drum sounds that trigger depending on the velocity. This is supposed to mimic the timbral chances that come from a drummer hitting a drum harder or softer.
It’s quite simple for you to set up a similar situation in the Ableton Drum Rack.
First, to layer multiple sounds on a single pad, drag the first sound onto the pad and then command–drag (Mac) or alt–drag (Windows) as many additional sounds as you want onto the same pad. That will embed an Instrument Rack with multiple sounds on the pad.

With velocity zone editing multiple samples on a single drum pad can trigger according to the input velocity.
As a default, all of the sounds trigger when you play the pad, but you can change this easily. In the Instrument Rack, click the Vel button to open the Velocity Zone Editor. A red bar ranging from 1 through 127 will show up on each sound, designated the range for velocity that will trigger each sound.
If that bar stretches all the way to 1, the sound will play at the lowest velocity. If it stretches all the way to 127, it will play the highest velocity.
Drag the red bars’ ends to set the velocity range for triggering each sound. You can select your drum sounds to try to mimic a real kit with softer sounds for the lower velocity values and velocity ranges that don’t overlap, or you can get creative and choose wildly different sounds with overlapping ranges.
Tune Your Drums
Studio drummers and producers often take pains to tune the drums to match the key of the song they’re recording. We don’t always think of drums as tonal elements, but they do produce pitch.
Keeping the drums pitched to the key of a song will help the beat sound more natural and fit more cohesively in the mix. Plus, it’s just good production practice regardless of whether your music is electronic.
It’s fun to tune your drums by ear and can get you some plenty satisfying results. With that said, there is some methodology behind tuning drums for those so inclined.
It’s good to try to tune the percussion sounds to a note in the root, third, or fifth of whatever key your track is in. In the key A major, for example, that would be A, C#, or E. However, you may not want to pitch the samples more than three half steps from its original position, since it might sacrifice the drum’s original character. At bare minimum, tune your drums to some note in your song’s key.
For those getting more technical, a spectrum analyzer will help you tune the drums, like the stock Spectrum device in Ableton Live.
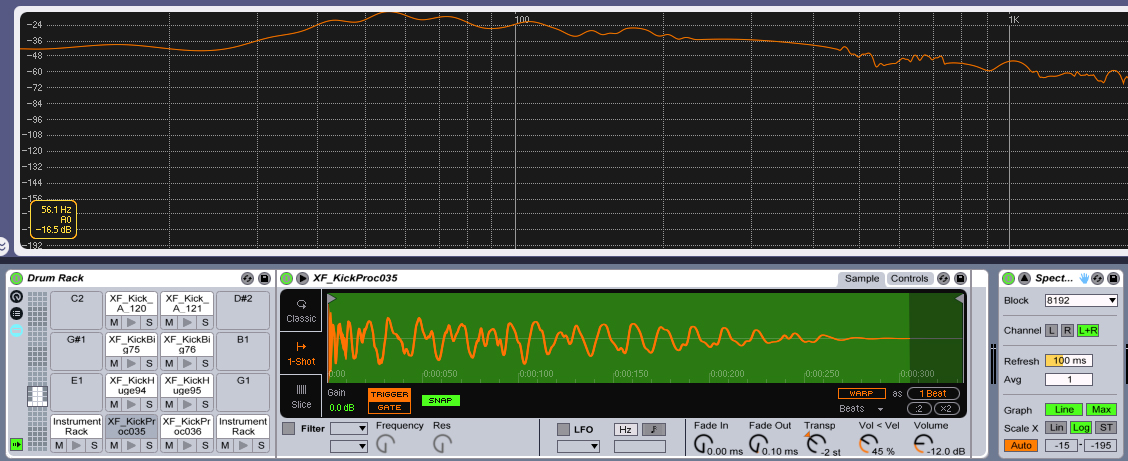
By analyzing a drum's pitch, you can transpose it to fit the song's key.
Drop Spectrum onto your drum track and open its larger display for a better view. Play a single note of your drum kit and then move your mouse cursor over the highest peak of the frequency wave in Spectrum to see the note of that frequency.
In our example of A major, if the sound is tuned to B, go to its Transpose setting in the Drum Rack and lower it two half steps to make it an A. Double check that it’s now tuned to A in Spectrum, and repeat that process for your other drum sounds.
Bang Out the Beats Yourself
With all of the great step sequencers available in software and hardware these days, it can be tempting to only sequence, quantize, and swing your way to funky beats. But some of the modern beat masters like J Dilla and Flying Lotus banged out their beats on MPCs or pad controllers. It helps their beats sound very natural, and it can help yours, too.
Sure, you might end up recording one drum at a time, but banging out an entire rhythm yourself can be quite satisfying once it’s all said and done. You may want to apply some quantization, but try somewhere around 50% to 60% so that you don’t let the machine take over.
For multisamples set to different velocity inputs, playing the beat yourself is the best way to take advantage of those hard and soft responses.