Since the release of Ableton Live 10 in February, we’ve been showcasing some of the new features and possibilities within the flagship DAW, like three powerful mixing tools and how to use the Echo plugin to recreate decades of classic echo and delay effects. Today, we're diving deep into Live 10’s new Wavetable synth.
For those who don’t know, wavetable synthesis refers to a process where the generated sound can start as one waveform, cycle through more, and end as another. As noted in Ableton’s look at the history of wavetable, it’s used as the basis of synths like the Korg Wavestation and the Waldorf Blofeld, as well as in music software like Native Instruments’ Massive.
A wavetable is created by a sampled sound, which you listen back to at various "positions"—different waveforms from the same sampled source. In Live 10's Wavetable, you can easily choose your positions by either clicking within the wavetable or using the scroll bar on the right-side of each oscillator. Then, you can apply LFOs to change positions automatically—causing the sound to morph as it travels up and down the wavetable.
While this instrument may seem daunting, it actually has a fairly intuitive layout for all its complexity.
Two oscillators and a sub-oscillator are on the left-hand side of the interface. That's where you'll choose your wavetables and positions. The middle section of the interface contains two multi-mode filters. And at the right-hand side of the instrument's interface, you'll find different windows to bring modulation to your oscillators and filters.
Because the possibilities in the instrument are so open-ended, we’ve decided to use Wavetable to make just two sounds, both inspired by Detroit techno. The first is an evolving pad that uses shifting wavetable positions. The second sound is a stab we'll use as a lead line. For these stabs, we'll use the synth for its rich, complex tones, but we won't be shifting our wavetable positions. (Therefore, you can recreate these stabs with many other common synthesizers.)
To make these pads and stabs, I teamed up with my friend and colleague, Elliot Berger, a chart-topping producer and sound designer. (You can check out his latest sample pack from Black Octopus Sound here.) Below is our step-by-step guide.
Creating Evolving Pads in Wavetable
The first thing we do is select two wavetables with interesting harmonic content. I find choosing something with a good variation is nice, because when we come to modulate it, it’s more interesting to listen to as it moves and changes over time.
For Oscillator 1, choose the "Retro" category and the "Echoes" wavetable. Using the scroll bar, move your wavetable position to 20%. For Oscillator 2, choose "Instrument" as your category and "Strings 2" as your wavetable. Use the second oscillator's scroll bar to move your wavetable position to 40%.
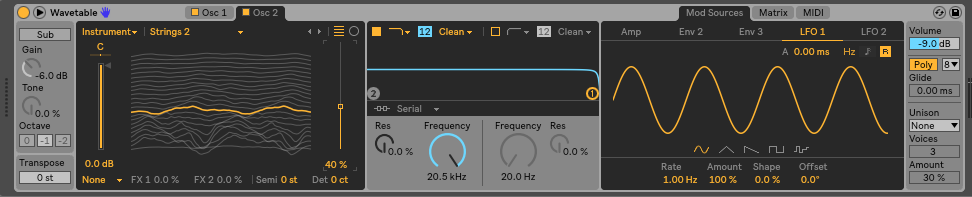
Now we need to alter the amp envelope so it feels more like a pad. On the far-right of the interface, select "Amp" under "Mod Sources," and change the attack to 545 ms. Leave the decay where it is, and increase the sustain to 0dB and the Release to 1.79 seconds.
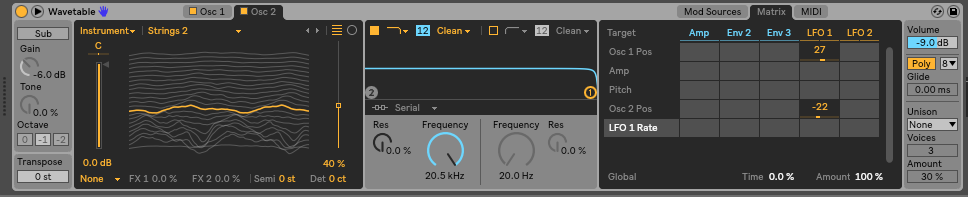
We also want to modulate the wavetables to help make the sound more interesting. Open up the modulation matrix by clicking the Matrix tab. Apply LFO 1 to the positions of both oscillators (which will titled "Osc 1 Pos" and "Osc 2 Pos" here). Set the LFO 1 amounts to 27 for the first oscillator position and -22 for the second.
Go back under the Mod Sources tab to sync LFO 1's tempo. To do that, go to the LFO 1 tab, select the small note icon in the top right of the LFO window, and change the rate to 2.
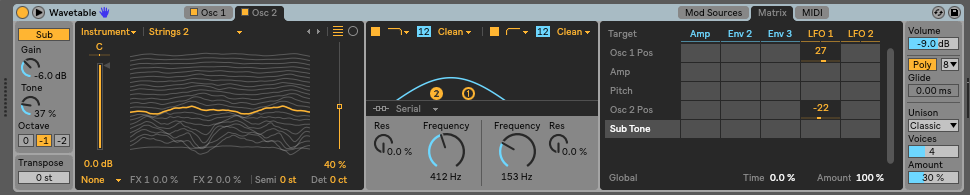
Next, we need to use filtering to tone down that harshness. Turn on both filters, leave them running in serial, and turn the frequency of the first filter down to 412Hz. Turn the frequency of the second filter to 153Hz.
At this point, the sound is still very thin. To thicken it up, turn on the sub oscillator by clicking "Sub" on the far left on the instrument's interface. Turn the tone up a bit to taste. Then, on the far right of the interface, turn the "Unison" setting on to "Classic," and turning the voices up to 4. Leave the amount at 30%.
The last thing we'll do is add some choice effects to bring it to life. This comes down to choice, but what we did was add the "Multi-Band Compression" preset from the Multi-Band Dynamics plugin. Then, with the Echo effect, change the time to quarter-note, push the reverb up a bit, and add a filter to cut out the low-end.
For this example we also chose to add LFO Tool, using the "Sidechain 1" preset, and boom—you’re good to go. Place this under your pad and you have Detroit Techno vibes at your fingers tips.

Creating Detroit Stabs—Subtractive Synthesis with Wavetable
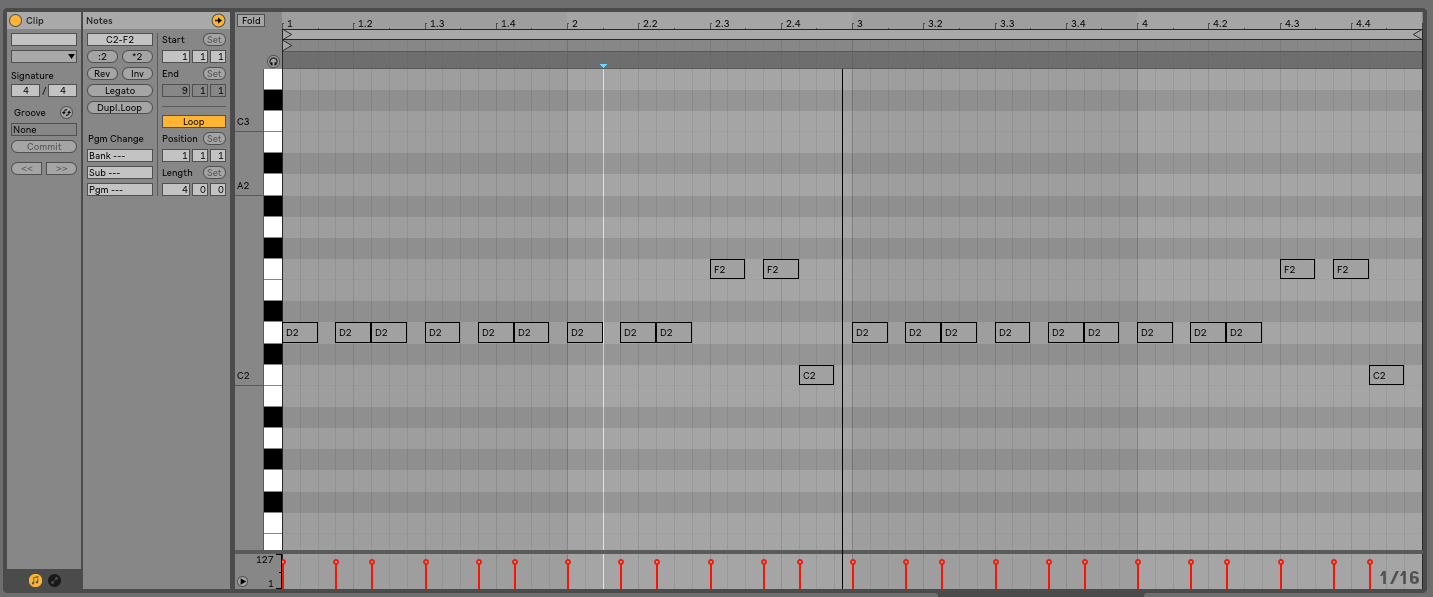
The first important part of making Detroit techno style chord stabs with Wavetable is the rhythm. It needs to be syncopated so we can get a groove when we side-chain to the kick later on. We recorded a four-bar pattern, in which you can see the off-set spread of our syncopated rhythm.
We will leave the Wavetable on its default "Basic Shapes" setting and turn on Osc 2 to achieve a chord. We need to use all oscillators to do this—put both Osc 1 and 2 in a sawtooth shape to start. Turn on the sub-oscillator too.

In order to generate a chord we of course will need to move the oscillators so that they are playing different notes. Move Osc 1 to +3 Semitones and Osc 2 to +7 Semitones (you can of course change as needed for different chords). This puts Osc 1 into a minor third and Osc 2 into the fifth. Our sub-oscillator is playing the root, which holds the chord together.

Now it’s time to make the sound pluck. Take the filter and switch it to 24 (by selecting the 12 value above it, it will change how steep the filter is). Turn the frequency all the way down, and then we'll use Env 2 to modulate this. So select Env 2 on the right-hand side and take the attack down to 0. Then, take the decay down to around 500ms and drop the sustain to 25%.
The sustain is important, because this is what will give the sound its character. Select the Matrix tab and modulate the filter with Env 2. To do this, dial the amount for "Filter 1 Freq." (If this or any other parameter you want to modulate isn’t already in your matrix, just click on the parameter while the matrix is open.)

As you can hear, now we’re getting somewhere. We just need to add some spice. Go to the left-hand side where the "Sub" tab is and dial up the tone a bit. Around 60% should be good here. This will make the sub become closer to a saw wave style and give the root more intensity.
Go back into the Matrix and dial Env 2 to the sub tone. Around 75% works. This will make the sub sharper on the attack of the sound but will drop off with the filter. To add a bit more character to our oscillators, we can tweak the wavetable positions. We’ve chosen 17 for Osc 1’s position and 7.8 for Osc 2’s position. But this is up to taste.
We will then add unison within the Wavetable itself. You can do this by going to the right-hand side, selecting "Classic Mode, 3 Voices," and adding a small amount (about 8% worked for us) to give some thickness to the tone.

Now, we will add a subtle LFO to the pitch. The amount is entirely up to you, but this will at least give a bit more of an analog flavor to the sound. To do this select Mod Sources in the top right menu and then LFO 1. Turn the amount down (we turned to 8.6%) and turn the rate up to 3Hz (once again, all to your taste). Then, go back into the Matrix and dial this into the pitch very subtly (we did 0.8).
For effects, we used the "Multiband Compression" preset in the Multiband Dynamics and then added an Echo. The Echo is set to 16th notes and the Dry/Wet Ratio is low at 17%. Finally, there is a limiter added to control the dynamics from jumping out.
As a little last touch we have gone back and turned the "Amp Env Attack" up slightly to give it a bit of a softer attack. We have also automated a filter up and down to open or close the sound and keep it interesting.
Now, we'll put both sounds together, and there you have it—Detroit techno with the new Wavetable synth in Ableton Live 10. From simple subtractive synthesis, to complex, ever-evolving wavetable synthesis, the new instrument is capable of a near-endless variety of sounds. And if you've followed along with us, you now know more than enough to start crafting your own.


If you're already an owner of Ableton Live 9, Reverb has many different upgrades available to get you up-to-date with this latest release.
- Ableton Live 10 Suite Upgrade from Ableton Live 1-9 Standard
- Ableton Live 10 Suite Upgrade from Live 7-9 Suite
- Ableton Live 10 Standard Upgrade from Ableton Live Lite
- Ableton Live 10 Standard Upgrade from Live 1-9
- Ableton Live 10 Standard Upgrade from Live Intro
- Ableton Live 10 Suite Upgrade from Live Intro
- Ableton Live 10 Suite Upgrade from Live Lite
- Ableton Live 10 Suite Upgrade from Live 10 Standard