It is a beautiful thing when musicians are able to nail their parts on that first take in the studio. It’s still wonderful if they can get a completely clean take on their second or even third try. But what if they record several takes that are only partially successful and want to combine the very best sections from each of them into a single composite track?
Below, I’ll describe an easy approach to track comping in Avid Pro Tools 11 on a Mac, but the process will be similar when working within any professional DAW on either a Mac or a PC.
Playlist View
Playlist View was introduced in Pro Tools 10. It enables you to view all of the takes that have been recorded on a particular track in a vertical arrangement, as shown in Ex. 1. Assuming you have recorded two or more takes, select “Playlists” from the track’s drop-down menu (or hold Control+Option+Command and click on the track drop-down menu adjacent to the track name) to enter Playlist View.
In Playlist View, clicking a take’s Solo button enables that take and mutes the other takes, rather than actually entering Solo mode. This allows you to hear the enabled take within the context of the mix.
To select a take, click on its waveform – it will be highlighted. Once a take has been selected, you can press “P” to select the take above it in the list or “;” to select the take below it if you want to avoid using a mouse.
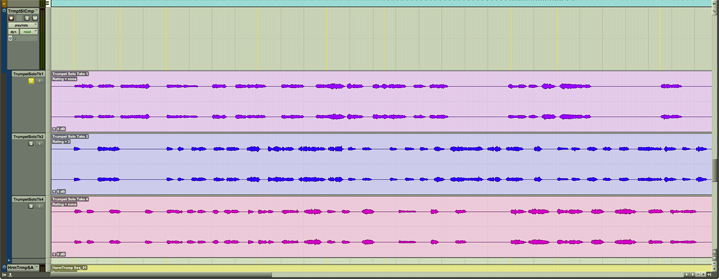
Ex.1 - Playlist View in Pro Tools 11. The empty Master Playlist or comp track is at the top with three takes of a trumpet solo below. The Solo button on Take 1 is active, indicating that Take 1 is active in the mix.
Rating Takes
The more takes you have to choose from, the more challenging it may be to keep track of which takes contain the strongest performances. To make this easier, takes may be rated one through five using the Rating option. You can activate this option by checking “Rating” in the View menu: View > Clip > Rating.
When Rating is activated, the rating number appears under the clip name in the waveform view as shown in Ex. 2. To enter or change a Rating on a selected take, choose it in the Clip menu (Clip > Rating > none or 1-5) or press Control+Option+Command and enter a number from 0 through 5 on the numeric keypad.
You can even choose to only view takes that have been rated with a particular number or numbers by right or Control clicking the name of the comp track, choosing “Filter Lanes” from the drop-down menu, and then choosing “Show Only Lanes With” and the Rating number.
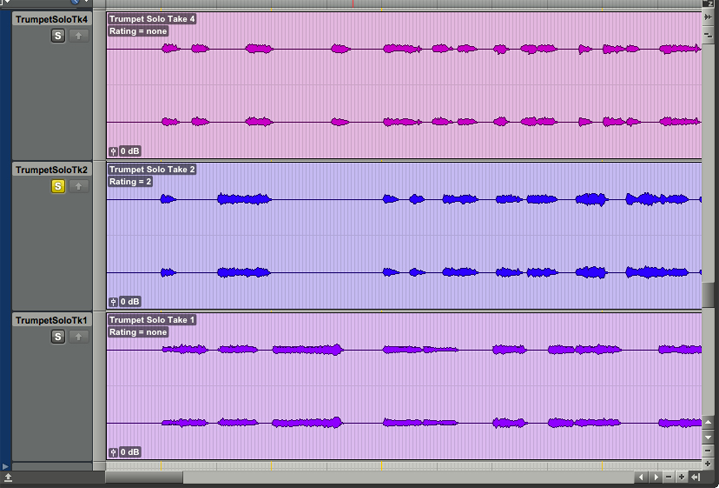
Ex.2 - Three takes of a trumpet solo in Playlist View with the Rating feature active. Take 2 has been assigned a rating of 2, visible just below the clip name in the clip.
Comping
Once you have identified which sections of which takes are the keepers, you are ready to create a composite track or “Master Playlist” as it’s also called. If you haven’t already done so, create a new empty playlist to be used for the comp track.
Next, suppose you have decided that the first section of Take 1 will be used for the first section of the comp track. Select the section of Take 1 you wish to use, click the upward-pointing arrow next to the Solo button, and that section will be copied into the comp track, as shown in Ex. 3.
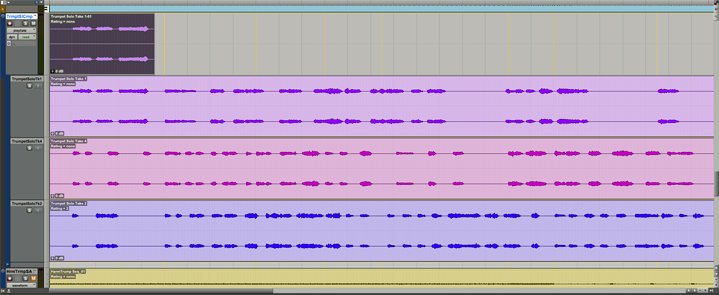
Ex.3 - The first section of Take 1 has been copied into the first part of the Master Playlist or comp track.
Want a section of Take 2 to come next? Just select it, click the arrow as before, and voila! It has been copied into the comp track, as shown in Ex. 4. Keeping doing this until you have a complete comp track.
Note that the takes are all colored differently and that the sections copied into the comp track retain the colors. This makes it easy to determine the source of each copied section.
Speaking of ease, there are numerous keyboard command shortcuts that may be used to save time and avoid using a mouse when comping. For example, not only can you select takes above or below the currently selected take using the “P” and “;” keys respectively, but Shift+S also solos the selected take. And rather than clicking on the arrow with a mouse, use Control+Option+V to paste the selected section into the comp track.
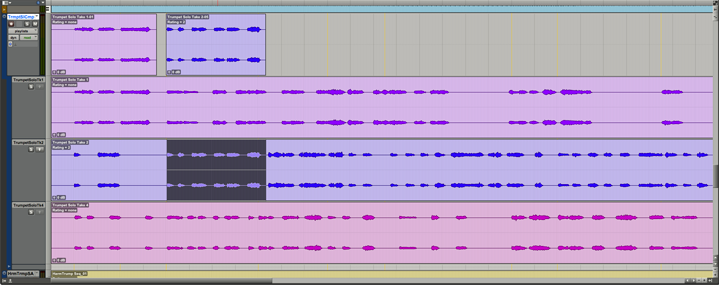
Ex.4 - The second section of Take 2 has been selected and copied into the second part of the Master Playlist or comp track.
Comping Vocals
Depending on the source material in the individual takes, you may need to tidy up the beginnings and ends of the clips in the comp track so that they flow smoothly into one another without audible artifacts.
This is particularly crucial when comping vocals, as there will typically be a gap between clips where the breath drops out. To make the comped track more natural-sounding, use the Trim Tool to extend the beginning of the clip on the right to the left just far enough to close the gap between the clips and make the transition from the previously sung phrase sound natural. Note that in some cases, extending the earlier clip to the following clip will sound better.
As always, use your ears rather than your eyes to decide what’s best!
RELATED ARTICLE

About the Author:

Barry Cleveland is a San Francisco Bay Area-based journalist, author, guitarist, and composer. He was an editor at Guitar Player magazine for 12 years and at Mix and Electronic Musician magazines before that. His book, Joe Meek's Bold Techniques is a cult classic, and he also contributed to Whole Lotta Led Zeppelin. He has released five albums, as well as composing music for film, television, and video games.