Softube Weiss Deess
New Price€166.48
Incl. VAT
Instant Download
This gear has sold
See similar gear from other Reverb sellers
Listed:over a month ago
Views:144
Saves:5
Offers:2

Chicago, IL, United States
Our users rate Reverb
Weiss Deess - it just works.
What it is:
The coveted de-essing of Weiss' DS1-MK3 in a plugin.
How we use it:
Sculpt away unpleasant "esses" and "shhs" without collateral damage.
Why it's cool:
With Weiss algorithms code-ported from the acclaimed DS1-MK3, you're guaranteed the last word in de-essing. With a combination of the highly-prized sonics of the Weiss DS1-MK3 – the go-to digital hardware de-essing unit used in top mastering studios the world over – and a totally modern and focused approach in design, Softube is psyched to announce the Weiss Deess Plugin. Stop searching, start succeeding - this is the de-esser.
Why Weiss Deess:
Compatibility
What it is:
The coveted de-essing of Weiss' DS1-MK3 in a plugin.
How we use it:
Sculpt away unpleasant "esses" and "shhs" without collateral damage.
Why it's cool:
With Weiss algorithms code-ported from the acclaimed DS1-MK3, you're guaranteed the last word in de-essing. With a combination of the highly-prized sonics of the Weiss DS1-MK3 – the go-to digital hardware de-essing unit used in top mastering studios the world over – and a totally modern and focused approach in design, Softube is psyched to announce the Weiss Deess Plugin. Stop searching, start succeeding - this is the de-esser.
Why Weiss Deess:
- It has two completely independent bands. Most de-essers have one.
- It has a variety of filter shapes and excellent band-width control, allowing users to hone in on precisely what they need to deal with, without collateral damage.
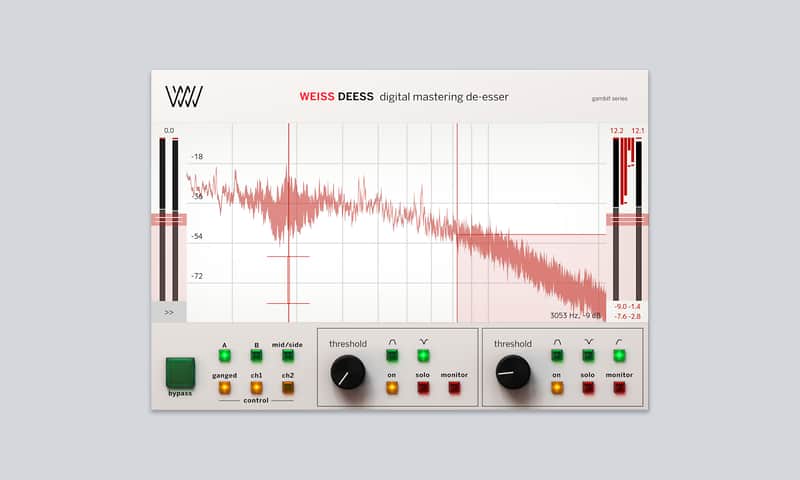
- It has unparalleled visualizations. A large, colorful, and intuitive display shows FFT readouts as well as filter shapes, so users can clearly see what effect they’re having on their signal.
- The faceplate GUI is uncluttered, focusing on giving great visual information, but a side menu allows control over everything; ratios, attack and release times, knee settings, make-up gain and more.
- A low-latency mode allows de-essing during tracking. Nothing beats getting it right on the way in.
- Lastly, and most importantly of all, the Weiss algorithms, code-ported from the gold standard DS1-MK3 unit, provide the best sounding de-essing in the world. Users’ work will sound better if they use this than if they don’t. It’s as simple as that.
Compatibility
Create a Softube/Gobbler account here: https://www.softube.com/index.php?id=myaccount
Download and install the Gobbler App
- Open the Gobbler App and sign in using your Softube/Gobbler account
- In the Gobbler App, click "Install All" to install all Softube products you have a license for - use the license key emailed to you by Reverb SYNC.
- If you have new licenses, keep the Gobbler App running when starting your DAW. The first time you run a plug-in, you will get a prompt for activation. Please follow the step by step instructions.
- We auto-detect your computer operating system, so just click the download button above.
- Find the downloaded plugin (it's in your computer's download folder, or wherever you've chosen to save it) and double click the installer.
- A plugin installer window will open. Simply go through the installation process.
- We will also send you an email with a link to re-download in case you need it.
- If Ableton Live is closed, open it and skip to #5.
- If Ableton Live is already open, go to Preferences.
- Go to Files & Folder.
- Click "Rescan plugins".
- Find the plugin in the Ableton plugins folder in the sidebar.
- Drag-and-drop the plugin onto your track at the bottom of the screen.
- Open Logic Pro X. Newly installed plugins should be detected automatically every time Logic is opened.
- If you've downloaded an effect or utility plugin, these can be used on an insert for any track in the mixer.
- Create a software instrument track if you downloaded a virtual instrument plugin.
- Under Default Patch, go to AU Instruments and choose the plugin you just installed.
- Open Pro Tools. Newly installed plugins should be detected automatically every time Pro Tools is opened.
- If you've downloaded an effect or utility plugin, these can be used on an insert for many types of tracks (Audio, Aux, Instrument, Master Fader...)
- If you’ve downloaded a software instrument, create a new Instrument track.
- Navigate to the Mixer and locate the newly created Instrument track.
- Select the desired instrument plugin by clicking on any of the Inserts on the Instrument track.
- Go to the Reverb SYNC Software and plugin Collection.
- Choose your desired plugin.
- Reverb will auto-detect your platform, so simply click the download button.
- Continue the installation process by following the prompt.
- Hover your mouse over the smart control button.
- Click Show Inspector icon.
- Click on plugins and choose your desired plugin.
General Instructions: