FabFilter Pro-DS De-Esser
This listing has ended
See similar gear from other Reverb sellers

Our users rate Reverb
What it is:
A transparent de-esser.
How we use it:
Transparently attenuate sibilance in vocal recordings.
Why it's cool:
Pro-DS' Allround mode makes for a quick and effective high-frequency limiter on any instrument.
Even when using the best mics, pre-amps and converters, sibilance in vocal recordings can easily get over-accentuated during post-processing like compression or saturation. But don't worry, FabFilter Pro-DS comes to the rescue!
With its highly intelligent 'Single Vocal' detection algorithm, FabFilter Pro-DS accurately identifies sibilance in vocal recordings and attenuates it transparently.
When using the 'Allround' mode, Pro-DS becomes a great tool for high-frequency limiting of any material, like drums or even full mixes. Try it out yourself!
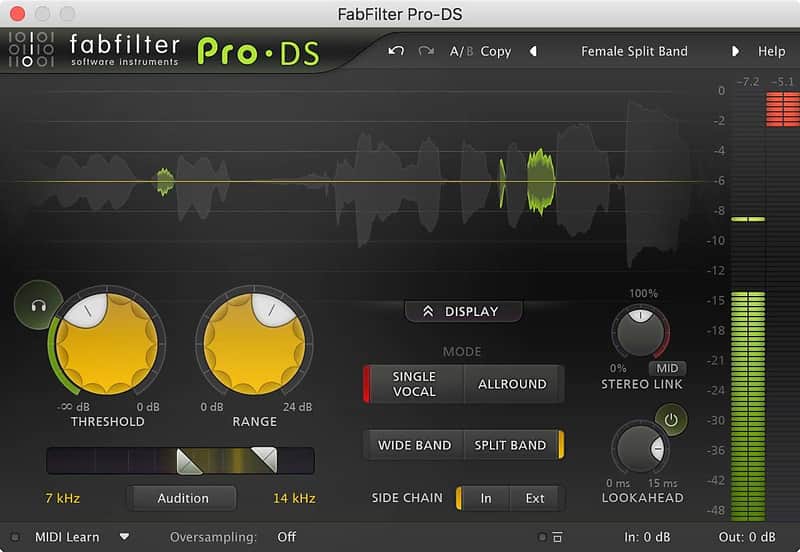
FabFilter Pro-DS offers everything you need to get the best result possible, presented in a simple and easy-to-use interface. Wide band or linear-phase split band processing, an optional look-ahead of up to 15 ms, adjustable stereo linking with optional mid-only or side-only processing, up to four times linear-phase oversampling... it's all there.
Features
- Highly intelligent 'Single Vocal' detection, and classic 'Allround' detection
- Transparent program-dependent compression/limiting
- Adjustable Threshold, Range and detection HP and LP filtering settings
- Wide Band or linear-phase Split Band processing
- Optional look-ahead time up to 15 ms
- Freely adjustable stereo linking
- Optional mid-only or side-only processing
- Up to four times linear-phase oversampling
- Real-time de-essing display, clearly showing the affected parts of processed audio
- Side-chain input meter, making it easy to choose a good Threshold value
- Real-time spectrum analyzer built into the HP/LP filter controller
- GPU-powered graphics acceleration
- High-quality 64-bit internal processing
- Double-click text entry of parameter values
- Large and compact interface sizes
- Stereo and mono plug-ins available
- Supports common Pro Tools hardware control surfaces
- MIDI Learn
- Undo/redo and A/B comparison
- Smart Parameter Interpolation
- Sample-accurate automation of all parameters
- Extensive help file with interactive help hints
Compatibility
Windows
- 32-bit: Windows 8, 7, Vista or XP
- 64-bit: Windows 8, 7 or Vista(x64)
- VST 2/3 host or Pro Tools
Mac OS X
- 32-bit: OS X 10.5 or higher
- 64-bit: OS X 10.6 or higher
- AU or VST 2/3 host or Pro Tools
- Intel processor
Installation Instructions
Installation Instructions:
- After you purchase your FabFilter product, Reverb SYNC will email your serial number
- To activate that serial number, go to: https://www.fabfilter.com/activate/
- Fill out the form
- After you have filled in the following form, a personal product license key will be sent to you by e-mail immediately
- You will be directed to download the plugin and activate it
- If Ableton Live is closed, open it and skip to #5.
- If Ableton Live is already open, go to Preferences.
- Go to Files & Folder.
- Click "Rescan plugins".
- Find the plugin in the Ableton plugins folder in the sidebar.
- Drag-and-drop the plugin onto your track at the bottom of the screen.
- Open Logic Pro X. Newly installed plugins should be detected automatically every time Logic is opened.
- If you've downloaded an effect or utility plugin, these can be used on an insert for any track in the mixer.
- Create a software instrument track if you downloaded a virtual instrument plugin.
- Under Default Patch, go to AU Instruments and choose the plugin you just installed.
- Open Pro Tools. Newly installed plugins should be detected automatically every time Pro Tools is opened.
- If you've downloaded an effect or utility plugin, these can be used on an insert for many types of tracks (Audio, Aux, Instrument, Master Fader...)
- If you’ve downloaded a software instrument, create a new Instrument track.
- Navigate to the Mixer and locate the newly created Instrument track.
- Select the desired instrument plugin by clicking on any of the Inserts on the Instrument track.
- Go to the Reverb SYNC Software and plugin Collection.
- Choose your desired plugin.
- Reverb will auto-detect your platform, so simply click the download button.
- Continue the installation process by following the prompt.
- Hover your mouse over the smart control button.
- Click Show Inspector icon.
- Click on plugins and choose your desired plugin.