Drum loops are an invaluable compositional tool that allow creators to quickly flesh out a track’s sound while facilitating easy arrangement and editing, all without fussing with MIDI or having to mic up a real kit. The flipside is that, because the very nature of a loop is to repeat exactly the same thing over and over, using drum loops can make a song sound very stock or amateurish if left totally unaffected.
Compounding this dilemma is the fact that many loops are designed to sound full and satisfying when auditioned alone, often heavily compressed and filling up most or all of the frequency spectrum, but this kind of instant gratification comes at the cost of space. Stock loops often take up too much space in a real mix and require some tweaking to sound natural.

Since most drum loops are stereo recordings of a full kit or a drum machine’s output, the options for altering them might seem pretty limited on the surface. The opportunities certainly don’t come close to mixing with eight or more drum mics on a traditional multitrack recording. Fortunately, there are many ways to shape and mold an uninspiring loop into something totally your own that’ll feel right at home in your track.
For starters, there’s plenty you can do right away. Maybe all you need is a high-pass filter to get out of the bass guitar’s way, a little EQ bump to bring out the snare, or some light distortion to blend into a heavier song. But if simple tricks aren’t cutting it and you’re looking to get a little more in-depth, we’ve detailed three techniques below that can help take your drum loops from stock and stale to dynamic and human.
Parallel Processing
The next logical step past processing a whole loop is to process in parallel, applying effects to a copy of the signal and mixing it in with the original. To do this, either duplicate the loop’s track or use an internal bus to route the signal to a new track. Either way, you’ll be inserting plugins only on one, then blending the “wet” and “dry” versions to taste. Be sure to have plugin delay compensation turned on to avoid phase cancellation.
Parallel compression on drums is pretty standard practice in modern music. But when you’re stuck with an overly compressed loop, employing the reverse of that technique will allow you to add some dynamic interest back.
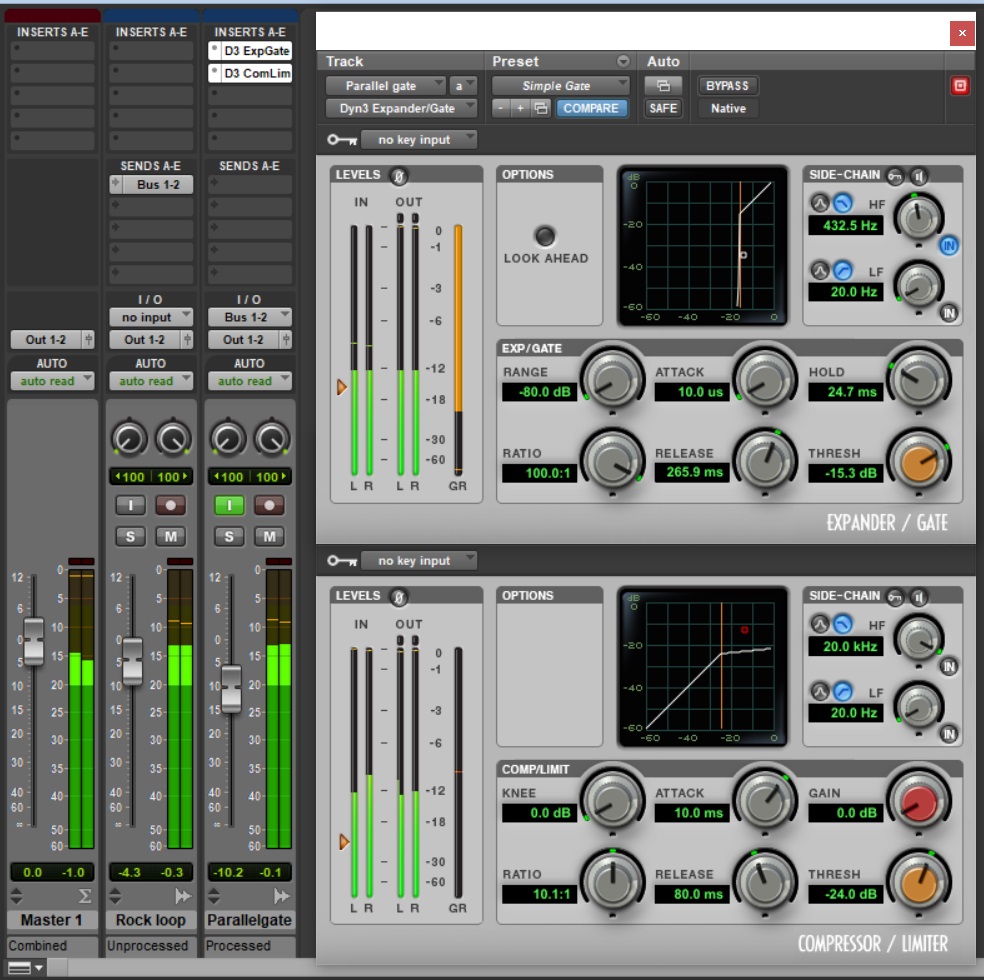
First, duplicate the track and insert a gate or expander plugin, setting the threshold to only let through the transient peak of each hit. Fine-tune the release time and ratio to control the dynamics, then mix the signal back in under the original for an extra pop on each beat. For an aggressive bite, throw a distortion plugin on the gated track.
The parallel approach also gives you the option to tailor the sound before it hits an effect, which can be immensely helpful. Useful strategies include reducing sibilance before a reverb plugin or accentuating the mids going into an amp simulator. Time-based effects—like phasers, flangers, and choruses—also work great in parallel, allowing you to add subtle interest without being too heavy-handed.
Chopping and Screwing
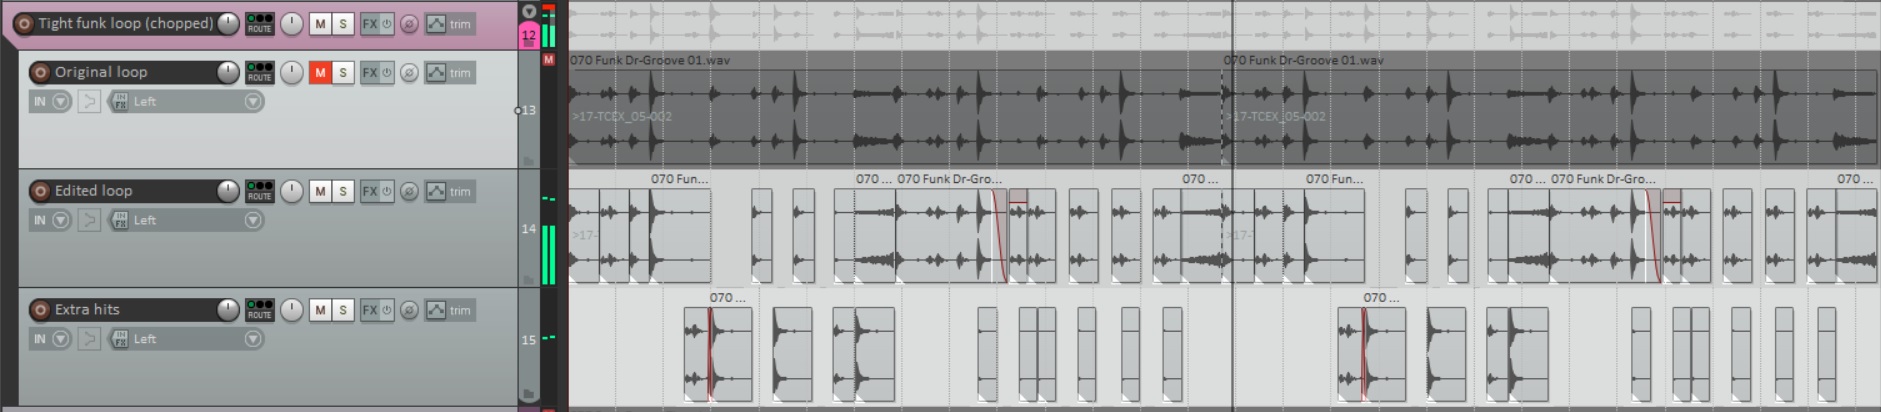
Sometimes, a loop might have the right sound for a song, but a groove that needs a little extra help. Instead of piling on the plugins, see what you can do with tools that have been around since the dawn of DAWs: switch to the edit window, zoom in, and get the scissor tool ready for some creative editing.
To switch up the beat in a subtle way, simply find an isolated kick, snare, or hi-hat hit, and crop it out with your editing tools. Copy and paste the sample onto a new track, placing extra hits wherever it sounds good (you may even end up building an entirely new beat like this).
To get a little weirder, try reversing parts of the beat. Crop out a short phrase and turn it around to create an off-kilter groove, cut the loop in the middle and mirror the first half backwards, or simply add a reverse cymbal every few bars.
Todays DAWs allow for stretching and warping of time without changing the pitch of your audio (like tape and vinyl would) and with fewer glitchy artifacts than ever. Each DAW handles it differently, so be sure to read up on Elastic Audio (Pro Tools), Time Stretch (Cubase/Nuendo), or Warping (Ableton).
Of course, if a sluggish or hyped-up loop is what you’re going for, you’ll want to either turn off the “time stretching does not affect pitch” preference or simply pitch-shift the loop.
Multiband Effects
If you want to process the kick or snare alone or ensure that part of the signal isn’t flattened by a particular effect, you’ll need to split the signal into multiple frequency zones and process them separately.
Pro Tools and other DAWs make it easy to route a signal to multiple new tracks with internal sends of busses. Reaper has “parent” and “child” tracks that let you group copies of a loop together under one master fader. Ableton (beloved by loop-users) has a unique workflow for frequency-splitting using the “rack” feature, and there’s even a dedicated tutorial for it.
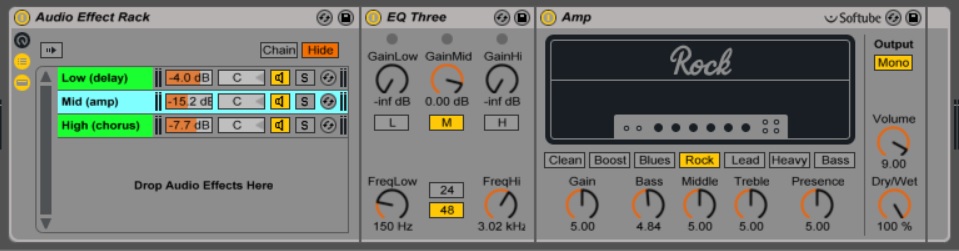
However you get your three copies, the next step is to divide the sound with EQ crossovers. Name first track “Low” and use a low-pass filter to cut out everything above the kick drum, low toms, and maybe just the body of the snare. Set the cutoff frequency wherever it sounds right (probably between 100-500Hz), with a relatively steep slope and an optional resonance bump.
Now switch to the third copy, name it "High," and do the opposite: filter out anything below the cymbals and maybe the snare overtones with a high-pass filter around 4-8kHz. Finally, call the middle track “Mid” and give it both high- and low-pass filters at the same frequencies you used earlier. The possibilities skyrocket once you’re able to divide and conquer the frequency spectrum.

Try these tricks next time your loop needs a little something extra:
Use distortion to make a dull kick drum pop, add a garage-y crunch to snare and hi-hats, or make cymbals sizzle
Add reverb or delay on just the middle band to avoid harsh sibilance or muddy low-end rumble
Insert expanders on the low and mid bands to shorten the envelope of the kick and snare without messing with the cymbals’ natural decay
Bring the cymbals to life with a phaser, flanger, or chorus (without making the entire kit sound like a John Bonham drum solo)
Accentuate transients—like hi-hats, cymbal bells, and stick attacks—with a slapback delay on the highs
All of this deconstruction can start to make things sound disjointed, so it’s usually a good idea to “glue” the sound back together with some gentle compression and EQ on the group’s master track or to add a hint of the plain sample back in alongside the affected version.