After five years since the release of its predecessor, Ableton Live 10 is now available in the Live 10 Intro, Live 10 Standard, and Live 10 Suite packages. While there are plenty of other new features to explore—and we will be exploring them throughout the coming weeks—we wanted to dive right into some of the software's new and improved functionality.
I teamed up with one of my audio colleagues Sacha di Piazza (who almost exclusively works with Ableton Live) to gain some quick insight into some of the best new features in Ableton Live 10, and how they can be utilized while mixing and in productions.
Below, you'll find our first impressions of the update, followed quickly by three ways Live 10 will improve your mixing: simplifying groups of groups, using the Drum Buss to add analog-style saturation, and making your low-end sit correctly in the mix with Bass Mono.

First off, when you open Ableton Live 10, you are in for a head spin compared to the layout of Ableton Live 9. The already amazingly clever and simple layout has somehow been refined even more. It is exactly what is to be expected from an audio application for 2018. It’s clean. It’s slick. It keeps all of what made Live 9 such a popular workstation, but it’s polished like a brand new sports car.
But what’s under the hood? As Reverb’s first look at Live 10 points out, the DAW includes a new Wavetable Synth, Delay, Distortion, production utilities, and workflow improvements. Aside from these features, there are some very creative and solid stock plugins—even better than many third-party plugins—that will help you along in achieving better mixes in a quicker way.


Simplifying Groups of Groups
The new Group of Groups feature in Ableton Live 10 allows a person to place a group out of selected channels, then easily apply another group within that group.
In the old school method of grouping or subgrouping within a DAW, you would send all channels to a new group/aux channel, then again send a set of groups/aux’s to another aux channel (i.e. drums and synth groups to a mix group). Before the time of DAWs we would send assignable channels all to a sub-group and then from those subgroups to another buss. This is handy in group-style mixing when you can sum together all things into one fader or process multiple groups at once.

The problem with older versions of Ableton Live is it took a bit of workaround to do this. Something to know about Ableton is you have to look at their DAW more like working within "modules" rather than actual audio routing. If you change your mindset to this while working in Ableton it all seems to make more sense. So with this kind of approach, when working with something like a group of a group, you would have had to get pretty creative to achieve this before Ableton Live 10.
On earlier versions you would first create a new Audio Track, then, in the routing section, click the "in" box for input monitoring. After this, from the "audio to" drop down on each of the group tracks, you'd have to select the newly made audio track as the destination. You then would have made a sub-group to the groups. We all quickly see how annoying of a workaround this was for Live users. Ableton apparently saw this too. So with Ableton Live 10 they made it as easy as pie. Just select all, and make to a group. Select Groups and make to a new group. Simple as that.
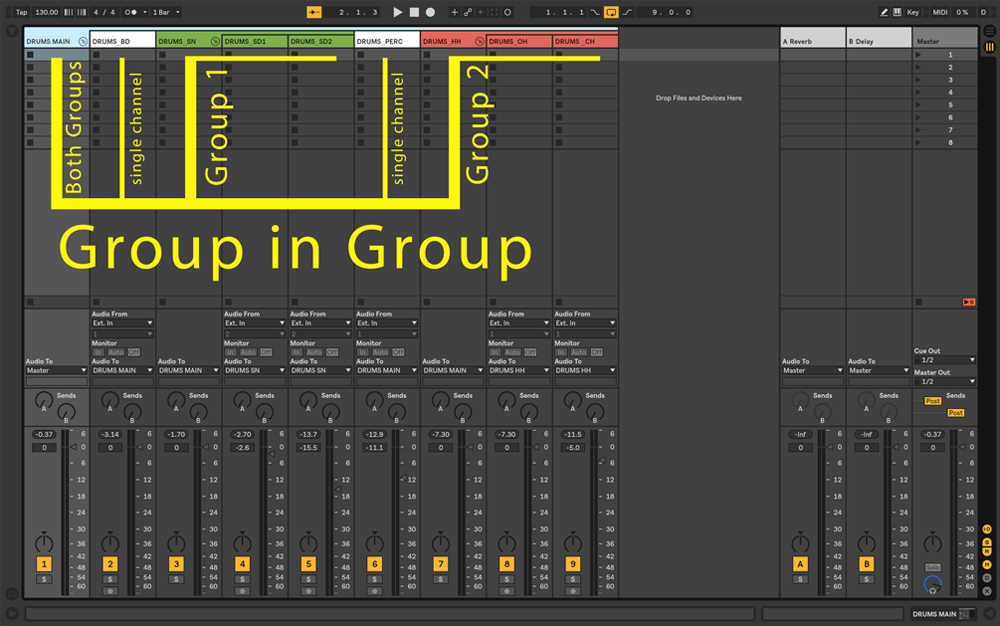
A good example of why you may want this option (and as a quick and easy feature) is you can then process each group or stack of groups as needed. For instance, assign Drums to one group, percussion elements to another, and then wrap both of these into a single group called "All Drums."
Using the Drum Buss for Analog Saturation Needs
Whether you spell it Drum Bus or Drum Buss when mixing (famous debate in the audio circles that it is) here is one thing you know: compressing a drum group is a must for gluing the drum mix together and making it cut through the rest of the mix.
Ableton has cleverly put together in a single plugin some great features to use on your Drum group or buss. The plugin is creatively thought up with analog-style processing in mind, which allows you to add certain saturation characteristics to the compressed signal.
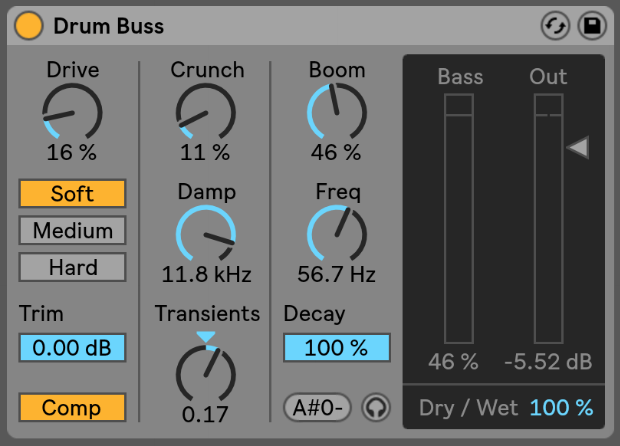
If you have read my other two articles covering Saturation in the Mix and Two Stage Parallel Compression on Drums, then you can see how this plugin can do both jobs in a single utility. It’s great. You can add "boom" with a simple knob that selects which frequency will be reacting in the low end, "crunch" for some grit in the transients, and select how much drive or coloring you want. You can then use this only as a saturation effect or for compression with saturation.
The Drum Buss plugin can be used in many ways and tie together groups or groups of groups, gelling them together with whatever style of analog crunch you need. It can be the perfect extra touch when working with drums, as you can hear in our audio samples here:
Making Your Low-End Sit Correctly with Bass Mono
With a straightforward name like Bass Mono, we can assume it does exactly what it says. It takes anything from a certain frequency and below to mono. But this simple new addition to the Gain Utility plugin has some great use.
When working with dance music, for instance, making your bass mono is very important, because your music will likely end up on a club's sound system that works either in mono, at least in the low frequency ranges. So it's very important your low-end is brought to mono so as to not introduce any phasing on a big system. You can apply the gain utility to a group of basses or the overall mix and set as mono all frequencies from, say, 150Hz downward.
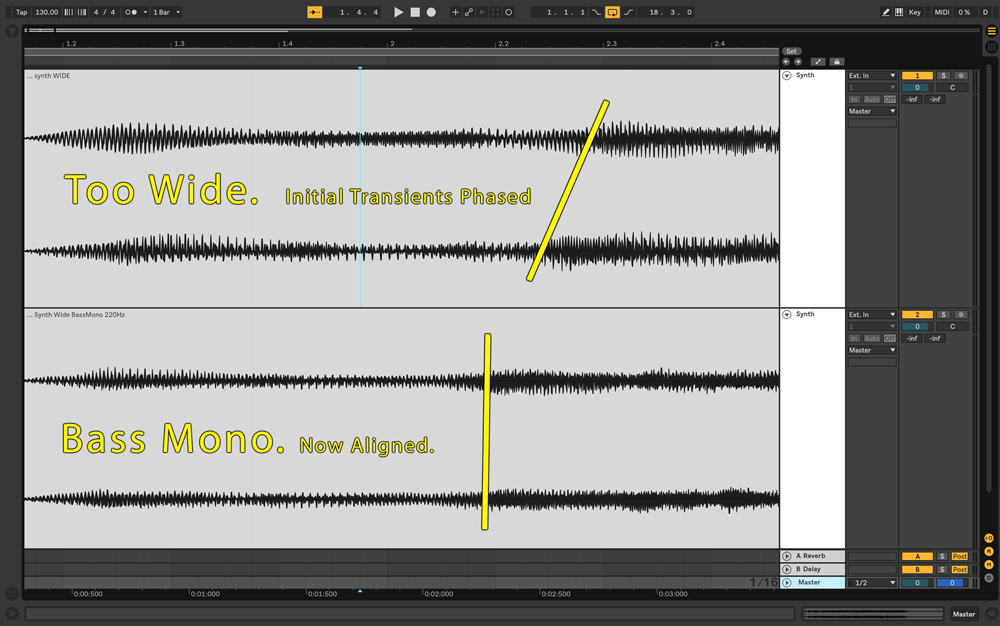
Another important reason you want bass to mono is that lower frequencies are more omnidirectional than mids and highs. So if you have a 50Hz tone in one speaker, you will have more problems feeling like it is coming from one side or the other, compared to that of, say, an 800Hz tone. Even if you spread bass out in stereo, it can still sound like mono, so why register it to one side or the other, especially if you could introduce phase issues in the process?

Ableton Live 10's Bass Mono addition to the gain utility plugin is a simple one knob, one click trick that will help your low-end and cleaning up your mixes. When speakers take on the same load at the same time for the same frequency in lower ends of the spectrum, it will let the bass drive harder and cleaner in the mix. And placing your bass in mono is not just good for bass frequencies—it also allows the higher frequency elements in stereo to remain wide, uncluttered, and clear.
Now, there may be one downside to Ableton's Bass Mono addition—my only concern when looking at this is not knowing how steep the frequency cutoff is, which, in return, could cause pre-ringing. I could be missing something, but I don't see a detailed option to adjust the linear phase mode, the steepness of this, or any control over it—but I am guessing they kept below a 24dB per octave roll off to ensure that it would not introduce pre-ringing.
If you choose to mono-make a certain area of a mix, you want to have the utmost control over how much and how hard it is being cut. But outside this apparent downside, this addition to the gain utility does get the job done quickly and precisely.
Hear an example below of a bass that was far too wide in stereo and then brought into mono:
So, before we push on into what's new about Live 10, we can already conclude that this is a great update coming from Ableton. It has all the bells and whistles still intact, but brought to a very current 2018 feel. As far as a production software goes, it is very user friendly and easy on the eyes, while allowing you to get the job done quick and efficiently with new tools to boot.
Workflow and the speed in which you can get your ideas out is the most important part of any creative outlet—Ableton has long known this and embraces it again here. If you are already an owner of previous versions of Ableton, check out all the ways below through which you can upgrade to Live 10.
- Ableton Live 10 Suite Upgrade from Ableton Live 1-9 Standard
- Ableton Live 10 Suite Upgrade from Live 7-9 Suite
- Ableton Live 10 Standard Upgrade from Ableton Live Lite
- Ableton Live 10 Standard Upgrade from Live 1-9
- Ableton Live 10 Standard Upgrade from Live Intro
- Ableton Live 10 Suite Upgrade from Live Intro
- Ableton Live 10 Suite Upgrade from Live Lite
- Ableton Live 10 Suite Upgrade from Live 10 Standard